Il Domain Name System (DNS) is a system used for resolving IP addresses. By default, your Internet network uses the DNS resolver of your Internet Service Provider (ISP), which is the operator that provides you with the Internet service. However, using the default DNS results in less privacy and slower speed. Using third-party DNS can significantly improve your browsing experience. Changing the DNS, however, is not an easy and intuitive operation. For this reason, special software has been created to facilitate the DNS change. In this guide we will explain how to easily change DNS on Windows with DNS Angel.
How to use DNS Angel to change DNS
DNS Angel is a software available in portable version, designed to facilitate the DNS change operation. It allows you to change the preset DNS without going through the Internet network settings and properties. You can apply the DNS of popular services, such as those of OpenDNS, to the Internet connection.
The most interesting feature of this software is the possibility to modify the DNS proposed by default, in order to replace them with the ones you prefer. Using DNS Angel is really very simple.
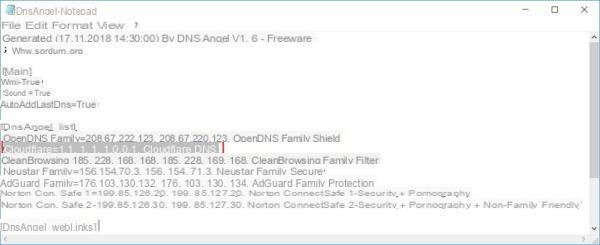
First of all, you need to download the software by going to the official DNS Angel page. Once downloaded, you need to extract the archive and open the file DnsAngel.ini. This is the software configuration file, which contains all the settings suitable for the correct functioning of the software. After opening this file, locate the wording [DnsAngel_List]. This section lists the 5 DNS resolvers suggested by DNS Angel and proposed in the graphical interface of the software.
To replace the preset ones with those of your interest, all you have to do is delete the row of one of the DNS you want to delete and type in the parameters of the resolver you want to use. The first parameter must be entered name of the DNS (eg CloudFlare), followed by the symbol "="And give it addresses of the chosen solver followed by a comma (e.g. 1.1.1.1, 1.0.0.1,). After the last address, the specific name of the service (eg CloudFlare DNS). Once this is done, repeat the procedure to insert the solvers you intend to use. Once entered, you can save and close the file.
At this point, you can start the software by double clicking on the executable file. If everything went well and you entered the DNS data correctly, you will see the names of the DNS resolvers you set earlier in the configuration file. To activate the desired service, simply click on the name of the solver to be set.
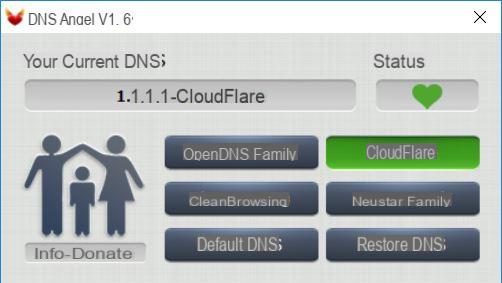
To return to the previous settings and disable custom DNS, you will need to click on the option Restore DNS. This operation will not restore the configuration file settings. Also, we remind you that to run the DNS Angel software, you need to have the administrator privileges.
Other interesting guides
Our guide on how to change DNS on Windows easily with DNS Angel Was it useful to you? So why not check out our related guides?
- How to change DNS on your Mac
- How to change DNS on Android even without root
- Google DNS: how and why to use them
- How to clear DNS cache in Windows 10
- How to change DNS on iPhone


