Index:
How to compare two Word files

To do an important job you need to urgently compare two Word files and you want to know how to do it without wasting hours and hours. Very well, then, as I explained to you in the introduction, I advise you to act through the default tool of the word processor.
That said, the first thing you need to do is clearly to boot Microsoft Word by clicking on its icon in the Windows Start menu or on your computer desktop.
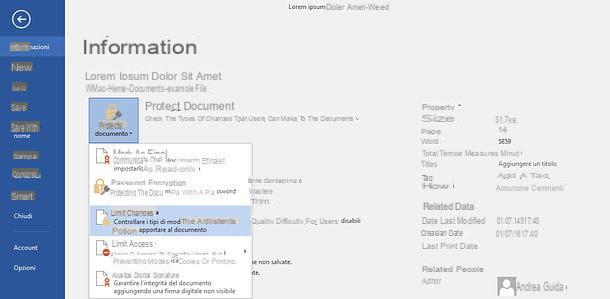
Once the program has started, open in the meantime a Blank Document to access the integrated text editor and all its tools. Once you see the blank page of Word, you will need to click on the tab revision which you can see located in the toolbar at the top of the program.
Then click on the button Compare (symbol of two facing pages) and select the item Compare ... from the menu that opens to start the tool Comparison preview which refers to the ability to compare two versions of a document. I will then explain how to perform the comparison procedure between two documents in detail.
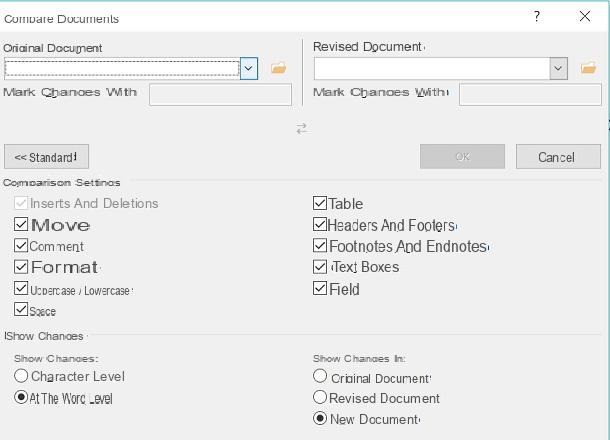
In the window that opens, first click on thefolder shaped icon placed under the heading Original document to select the first document to compare; you will thus be able to identify the first document to be imported into the word processor.
You can also choose from recently opened documents by clicking the button with the down arrow symbol. In this way, a drop-down menu will open that you can scroll to find the document of your interest among those recently opened.
You will then have to do the same thing at the wording Revised document. Then choose whether to click onfolder shaped icon to browse all the files in your computer memory and thus locate the file and the second file to load. Instead, clicking the icon with the down arrow symbol you can use the drop-down menu to browse the list of recent documents.
Once you have selected the documents you want to compare, then press the button OK to start the comparison. Before activating the tool Comparison previewby pressing on OK, don't forget that you can choose and customize in detail which elements of the document to compare.
To do this you will need to click on the button Other (located at the bottom left): you will thus extend the display of the tools and additional possibilities for comparison; you will see these items in correspondence with the wording Comparison settings. In this way you can put the check mark next to the items related to the desired options such as movements, formatting, spaces and tables, etc.).
To further customize the options relating to the comparison tool in the Microsoft Word program, I recommend that you pay attention to the wording Show changes. In correspondence to that item you will be able to see some options that will allow you to compare documents in a personalized way.
Just to give you an example, you can choose whether to show the changes in the original document, in revised document or in a new document. Just put the check mark on the item of your interest.
Once you have customized all the Microsoft Word comparison mode settings, you can confirm them by pressing the button OK that I have indicated to you earlier. At this point, you will find yourself in front of the comparison results in a new document or in the original document, depending on the options you have indicated.
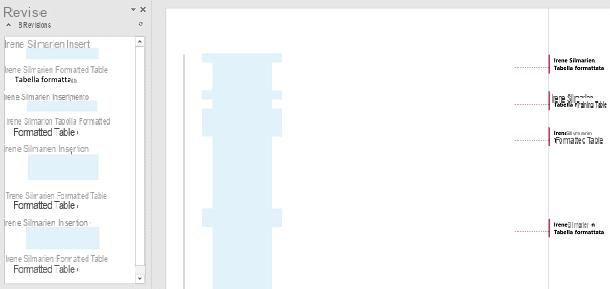
Now you will notice that, in the center of the new Microsoft Word window that opens, you will find your document with all the different parts present in the two documents being compared highlighted in red. Then click on the red bar on the left side of the sheet to open the comment box on the right. In this box you will find the detailed description of all the differences that were found by comparing the two documents.
You can also activate this special view by tapping on the wording Simple comments and selecting the wording from the drop-down menu All comments. Also click on the entry Revisions pane to also view the details of the revisions.
At the end of the comparison, you can save a copy of the result in a very simple and immediate way, with all the differences between the documents highlighted in red. To do this you will need to click on the button Fillet located at the top left and selecting the item Save with name give the menu check if you press.
How to view and compare documents side by side
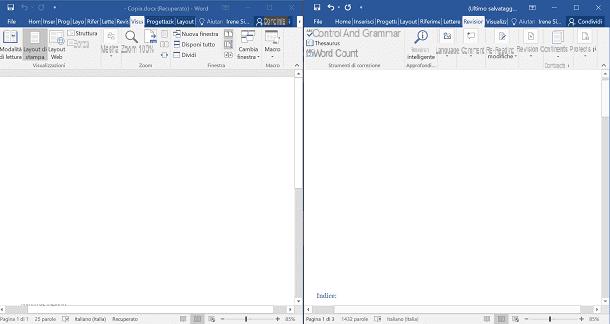
To compare two documents, then also use the mode Tile on Word which allows you to place two text documents side by side and manually scroll through them to view the changes.
Clearly, unlike the procedure I indicated in the previous lines, this mode is more suitable for documents with a few pages or which do not have many revisions, as you will have to make a comparison in a completely manual way.
To carry out this procedure you must first open the two documents you want to compare using the mode Tile. Then click on their icon from your computer desktop or open them from the folder in which they are located. Then open both the original document and the revised or modified document: don't worry about the fact that two Word documents will open in two separate tabs because in the following lines I will explain how to view with the mode Tile.
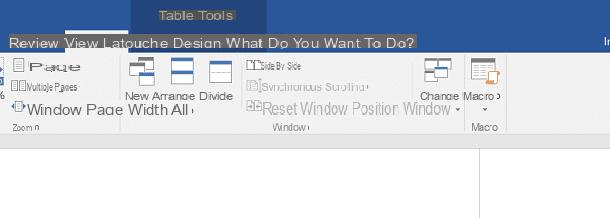
Once you have the two Word documents open, click on the tab Show that you can see in the top menu of Word and, at this point, then click on the wording Tile: these two documents you have opened will automatically be placed side by side.
Once you have placed the two documents side by side, you can act from the card Show to customize some options of the display mode of this tool Tile of Microsoft Word.
Just to give you some examples, by clicking on a document and you will find the option activated New window: this will open a second window of the document you have selected, so that you can work on different points of the same at the same time.
By clicking the button instead Arrange everything you will stack all the windows you have opened and tiled; in this way you can see them all at the same time. Finally by clicking on the item Divide, which is always located in the menu View, you can view two sections of a document at the same time. In particular, this button is very useful for viewing a section and at the same time editing another.
Finally, don't forget the button Synchronous scrolling which, if activated, allows you to scroll together two documents; you can use this feature to compare documents, working line by line to find any differences. To quickly switch from one document to another, then press the button Change window.
How to compare two Word files