Preliminary information

Basic, WordPad it has very basic table support and, which can make it difficult to use, does not have any type of menu function key that allows the rapid addition of elements of this type, which is instead expected on slightly more complex software (ex. Word o LibreOffice Writer).
Therefore, the first thing I want to tell you is to avoid looking in the application menus for features related to the management of tables because, unfortunately, you are destined not to find them: the only way to add simple tables in WordPad is to use special characters , which I'll tell you about in one of the later sections of this guide.
If you need a more elaborate table and with graphic elements more consistent with the type of document you are creating, you can take advantage of a very specific functionality of WordPad, which provides inserting objects from other programs on your computer.
In other words, if you have a spreadsheet processing program such as Microsoft Excel, you have the possibility to import a table created by Microsoft software into WordPad, and manipulate it from within the program itself.
If you have not yet installed Microsoft Office (and, therefore, Excel) on your computer and intend to proceed as soon as possible, I recommend that you read my guide on how to download Microsoft Office.
Create a table on WordPad

create a table on WordPad, you can follow two different procedures, both of which are very simple to put into practice. The first does not require the use of external programs and takes advantage of the "rudimentary" program management mechanism, while the second involves interaction with Microsoft Excel, as I have already mentioned. Here are all the details.
Elementary tables
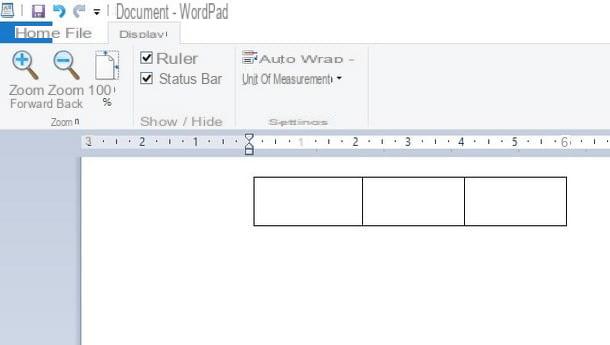
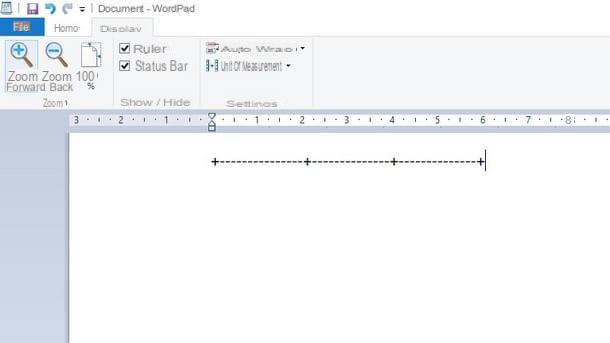
If you don't need to build a particularly complex table, you can insert a basic combination of rows and columns in WordPad using characters + (more) is - (less) on the computer keyboard. They can be placed in different parts of the keyboard, depending on the model you have: usually the key capacitor positive (+) lead it resides right next to the key Submit, while the (-) is located to the left of the button Shift right. Alternatively, you can find them inside the numeric keypad, if present (if so, make sure the NUM LOCK keypad is active).
After identifying the keys, open WordPad on your computer by recalling it from the folder Windows Accessories / Accessories placed in the menu Home (l'icona a forma di pennant located in the lower left corner of the screen) and start typing the content of the document you want to create.
When you have reached the stage where you need to insert the table, move to a new paragraph (by pressing the Submit on the keyboard) and make sure not to type any characters: starting from this moment, you can start making the table using the keys capacitor positive (+) lead e negative (-) lead.
How? I'll explain it to you right away: with i more you must indicate the "edges" of each cell, ie the beginning and the end, while with i less you have to specify the width of the cell itself (this character must be repeated until we reach the desired size). Having said this, it might seem difficult but, I assure you, in practice it is much easier than you think!
Each (+) corresponds to the end and the beginning of a cell while the (-) represent the body of the cell, so all you have to do is repeat the concatenation of the characters until you reach the desired size for each single cell and for the table as a whole.
If you have trouble seeing the fonts on the document, you can help with the functionality Zoom, present in the menu Show, located at the top: from there, you can take advantage of the buttons Zoom in e Zoom out to facilitate you in the realization of the table.
As soon as you have reached the desired size (remember that you must end the concatenation with a (+), without adding any other symbols), press the key Submit on the keyboard to see the table appear automatically.
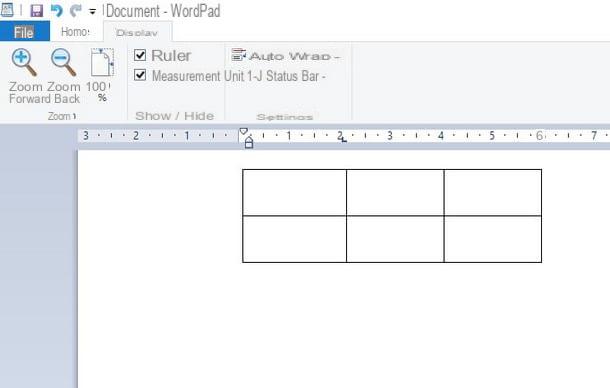
At this point, you can enter the necessary data inside each cell, just like you would on any other program with this functionality.
If you need to add more lines, simply click inside the last cell on the right (at the end of the word contained, if any) and press the key Submit of the keyboard: if everything went well, another line will be generated which is identical in all respects to the one immediately above. You can repeat these last steps for as many rows as your table needs.
Complex tables
What I showed you a moment ago is a method to create relatively simple tables, suitable only for containing data (and without the possibility of manipulating them with automatic features). If you need a bit more complex tables, you have to rely on integration with Microsoft Excel instead, as I already mentioned to you at the beginning of this guide.
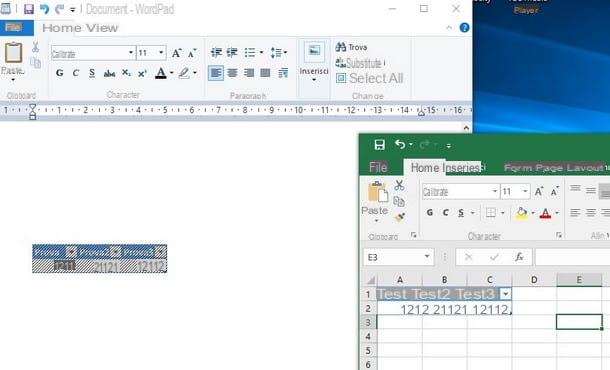
To proceed, therefore, start WordPad on your computer, start creating the document by entering the text you are interested in and, once you have reached the paragraph where you want to add the table, click on the button Insert subject attached to the top bar of the section Home.
On the screen that opens, put the check mark next to the item Create new, then select the item Microsoft Excel worksheet and click sul pulsating OK: if everything went smoothly, a new Microsoft Excel window should open, through which you can create the table you need.
Therefore, enter the data of your interest in the various cells, select them using the mouse (just "drag" the selection on all the cells to be included in the table) or the keyboard (using the keys Ctrl e Shift) and finally click on the menu Inserisci and then on the button Table to create a new table from the data entered in the worksheet. During this phase, the table will also appear in real time within WordPad.
Once you have finished creating the table in Excel, it is not necessary to save the spreadsheet created, since the object is imported "on the fly" in WordPad, during the creation phase. So, to finalize your work and go back to WordPad, you simply have to close Excel, refusing to save the current spreadsheet, and… enjoy the result!
If you are not satisfied with the size of the table in the document (in Excel it may appear much larger than it appears in WordPad), you can resize it as you like by clicking on a point of the same and acting on the white squares present on the edges, until you reach the desired size.
If you want to learn more about how to create and manipulate a table in Excel, I suggest you read my specific guide on how to make a table in Excel, in which I explained to you in detail how to use the dedicated features of the Microsoft program.
How to make a table on WordPad