A tutti può succedere di cancellare delle photo importanti per errore, ma non tutti sanno come reagire in maniera corretta di fronte ad a event of the genre. Molte persone if fanno turns on the panic. Nella speranza di ottenere indietro i propri dati, richiamano vecchi punti di ripristino del sistema, installano presumed applicazioni miracolose trovate su Internet e passano ore ed ore in attesa che le parrot preziose immagini saltino di nuovo fuori. Qualcuno scollega addirittura il computer dall'alimentazione elettrica, ma naturally finisce tutto with a buco nell'acqua (e nel cuore, considering the affettiva valenza che possono avere le foto).
In realità se se him giuste da fare quien si cancellano dei file importanti sono due: cercare nei dischi di backup la versione più recente dei dati perduti (ammesso che si abbia l'abitudine di creare delle copie di backup dei propri dati) e tentare di recuperare i file cancellati with the software really adatti allo scopo. Operazione, questa, che richiede la massima tempestività possibile.
When the part of the album che ospitava i dati does not come riscritta, cioè does not come occupata da nuove informazioni, è infatti possibile I will recover and file cancellati sfruttando dei ad hoc programmi, quelli cui accennavo poc'anzi. Ma quali? I will tell you this, with my own guide dedicated to How will I recover the photo cancel on the PC? (oltre che dal Mac). I have learned a little bit or a little bit of free time and I want to tell you that I am using it for the reason that it is printed. Non posso prometterti nulla, sia ben chiaro, tutto dipende dalla condizione sopra descritta, ma, come si suol dire, tempt non nuoce. Sei d'accordo?
PhotoRec (Windows / Mac / Linux)
Have you ever heard of PhotoRec? Probably not, and I present it to you. Trattasi di an open source application il cui scopo è recover dati da hard disk, chiavette USB e memory card SD. È completely free of charge and its use of the successo - te l'assicuro - è notevolmente maggiore rispetto a quello di molti software commerciali. È available per tutti i principali sistemi operativi per computer: Windows, Mac and Linux. Please note that PhotoRec is coming scaricato anche TestDisk, a software for the recovery of the data and the ripristino delle partizioni perdute, che but at the moment not you serve.
To use PhotoRec, connect immediately to its official website and click on the name of the operating system you use (eg. Windows o Mac OS X Intel) sotto the dicitura TestDisk & PhotoRec x.x which is at the bottom, in order to download it to your computer.
A complete download, using a Windows PC, estrai tutti i file contenuti nell'archivio ZIP che hai appena ottenuto e avvia il programma qphotorec_win.exe.
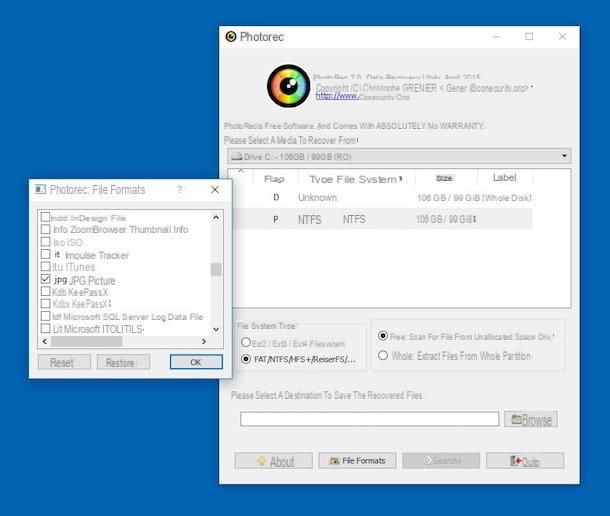
Nella finestra che si apre, espandi il menu a tendina che si trova in alto e seleciona il fisso del tuo PC (es. Drive C:). Dopodiché scegli la partizione principale dell'unità (es. NTFS xx / xx GB ) and metti il segno di spunta accanto alle opzioni FAT / NTFS / HFS + / ReiferFS e Free per "dire" to the program di controllare only the spazio released from the disc.
Adesso devi scegliere i tipi di file da recuperare, ossia le foto digitali. Clicca quindi sul pulsating File Formats che sta in basso, award Reset per azzerare the initial selection of the format of the file will recover in the finestra che si si - metti il segno di spunta only accanto alle estensioni relative alle immagini digitali: JPG, PNG, BMP, GIF etc.
Ad operazione completa, pigia su OK, select the poster in cui save the photo recover from PhotoRec by clicking on the button KATEGORIEN I awarded Search per avviare il recupero dei dati. Tutte le immagini trovate da PhotoRec verranno salvate automatically nella cartella da indicata.
If a Mac is used, it will impibe the PhotoRec version that works from the command line. Dopo aver stratto tutti i file contenuti nell'archivio ZIP scaricato dal sito del programma, avvia dunque l'applicazione photorec and enter the password of your account using your macOS.
At this point, scegli il disco da cui I will recover the photo, indicates the main part and selects the option Other (for richiamare le funzioni di ripristino adatte ai drive formattati in FAT / NTFS / HFS / ReiserFS).
Per finire, select the voice Free, specifies the poster in cui salvare le foto (premendo i tasti Submit e C) and attended the software porti to finish il suo lavoro. Lastly, in this case, you have recovered the PhotoRec summer, save yourself from the inside of the poster.
RePicvid Photo Recovery (Windows / Mac)
Another great program that has been for you to get back to recover the photo cancel from the PC è RePicvid Photo Recovery. If you try a free instrument (eventually available in a payment variant that you will get back, you will also recover the file typology) and it is functional if your Windows is your Mac, which is in a scansion of the computer, alla ricerca delle foto rimosse e di ripristinarle senza particolari difficoltà. There is also a beautiful interface that is used for its functionality and simplicity.
You ask me how to make use of it? I'll point it out to you right away. First, go to the program's website and click the button with the operating system logo che stai using per scaricare the dedicated version.
In completeness, you are using Windows, apri il file GIHO_RePicvid_V2.execlick your Yes / Run and select the item I accept the agreement. Then click on Next four times in a row, come on install and complete the setup by pressing on Finish.
On Mac, on the other hand, open the .pkg package obtained and follow the installation wizard that is proposed to you on the screen by always clicking on Continue and typing, when prompted, the password for your user account on macOS
Once the installation is complete, start RePicvid Photo Recovery (if it did not start by itself), close the warning you see about the possibility of switching to the paid version of the same and click on Photo / Graphic. Then, select the unit you want to analyze and press the button Scan.
If you deem it necessary, you can limit your search to only certain file formats. To do this, click the button Advanced Settings placed at the bottom and then select the formats of your interest and then press on OK.
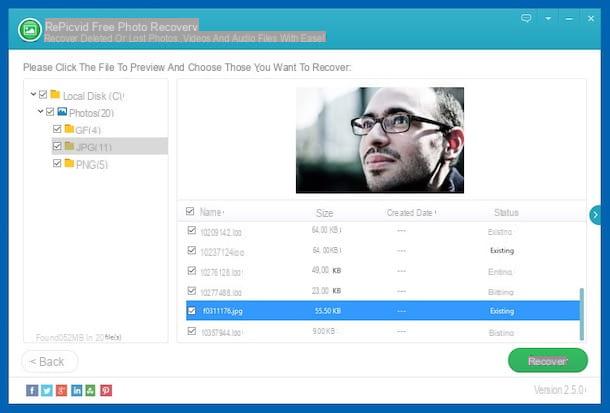
Once the analysis procedure is complete, select the reference position from the bar on the left side of the window and on the right you will find listed all the photos identified that you can restore. If you want to preview it before starting the restore process, simply click on it.
Finally, select the photos to be recovered by unchecking the ones you are not interested in and press the button Recover. Done!
Recuva (Windows)
In the unfortunate event that PhotoRec and RePicvid Photo Recovery did not meet your expectations, you can try to recover deleted photos from PC with Recuva, a free data recovery application made by the CCleaner developers themselves (I told you about it in detail in my tutorial dedicated to the subject). The only negative, if we want to call it that, is that it is only available for Windows.
To download it on your PC, connected to its official website and click on the item CCleaner.com collocata sotto the dicitura Recuva Free. The download should start automatically, if this does not happen click on the button Start Download in the center of the page in such a way as to force it "manually".
Once the download is complete, start the software installation package (rcsetupxx.exe) and click on your button Yes. In the window that opens, select cittàno (cityn) from the menu for choosing the language at the top right, click on install, wait for the program files to be copied to your PC and press on Run Recuva to conclude the setup and start the program.
Now that you see the software window on your desktop, click on NEXT and metti il segno di spunta accanto alla voce Images (in order to search only for digital images, and not other types of files) and then presses on again NEXT. Choose the option I'm not sure to scan all the disks in your computer or select one of the other available options (eg. In Documents) to intervene on a specific position and press again on NEXT.
At this point, metti il segno di spunta accanto alla voce Enable deep scan (in order to perform a thorough scan of the unit, much more effective than the standard one in recovering digital photos) and presses the button starts to start searching for files.
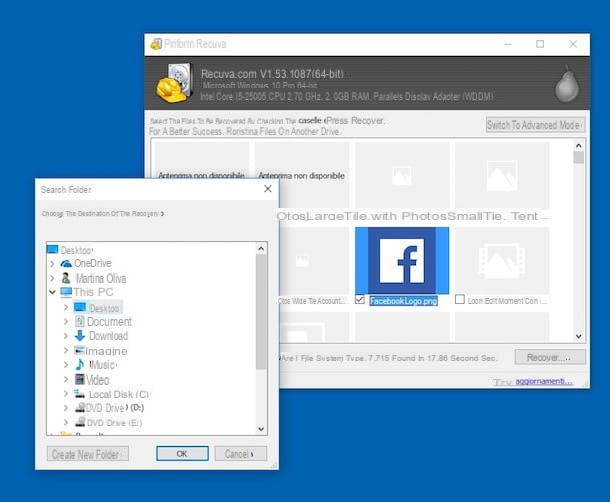
At the end of the scan, select the photos you want to recover by placing the check mark next to their thumbnails (the ones that are really recoverable are the ones you can see the previews, the others are almost always damaged) then click on the button Recover ..., select the folder in which to save the images and that's it.
If you prefer, you can also switch to the advanced mode of the program by clicking on the appropriate button in the upper right part of the window. By selecting the images you are interested in from the list on the left you can then get more info on the reference file and you will be able to understand exactly whether they are recoverable elements or not. Files with the green dot can be recovered, while those with the red dot No.
Easy Digital Photo Recovery (Windows)
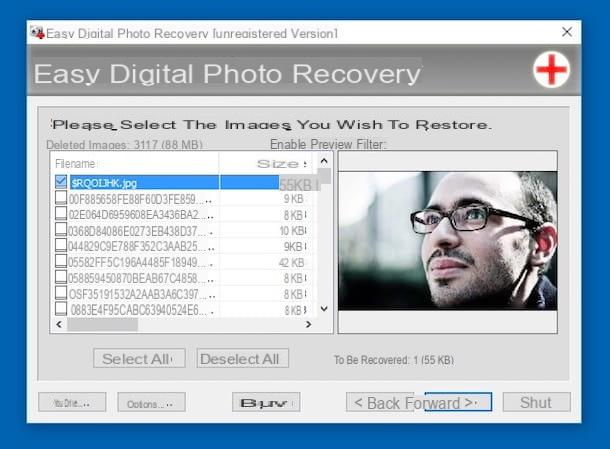
Did none of the programs to recover deleted photos from your PC that I have already told you about convinced you in a particular way? Then rely on Easy Digital Photo Recovery and you will see that you will not regret it. This is another tool available only for Windows operating systems that allows you to recover deleted images (deliberately or accidentally) not only from the hard disk but also from pendrive, memory cards and any other media. It uses very powerful algorithms and is usually quite effective. It is free but is also available in a paid variant with additional functions.
To use it, connect to the program's website and click on the button Download, in order to start downloading immediately.
When the download process is complete, open the file EasyDigitalPhotoRecovery-x.x-Setup.exe just got it and click on Si. So press on OK, its Accept and Install. Conclude the setup by clicking on end.
Now that you see the software window on your desktop, select the disk you intend to scan and press on NEXT. Then wait for the scanning procedure to start and finish.
When you will be shown the list of files that have been identified, put the check mark next to the name of those you want to recover (the relative preview will be shown on the right) and press the button NEXT placed at the bottom. Then click on the button Sfoglia ..., select the folder where you want to save the items you are about to restore and click NEXT.
DiskDrill (Mac)
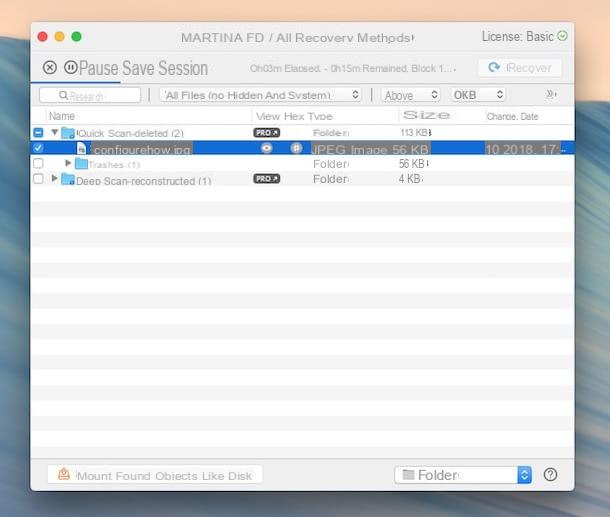
Diskdrill is one of the best data recovery software on Mac. Unfortunately it is not very cheap, it costs 79 euros, but it can often be found on offer in promotional bundles and then a free trial version is available (the one I used to write this step) that allows you to test its effectiveness in the field (it shows a preview of the files that can be recovered, but to really recover them you need to purchase the full version of the software).
To download the DiskDrill trial on your computer, connect to the official website of the program and click on the button Scarica free. When the download is complete, open the .dmg package that contains the software and copy its icon inside the folder Applications say macOS.
At this point, start Disk Drill by right clicking on its icon and choosing apri twice in a row, in order to go around the limitations imposed by Apple on unauthorized developers.
Once the program window appears on the desktop, click on the button Start, type the password of your user account on macOS and press Submit to access the main screen. Then locate the unit on which you intend to go to act and click on the button Recover which is next to its name or the reference partition.
Once the analysis procedure is complete, all you have to do is locate the files to be recovered by expanding the folders listed in the Disk Drill window or using the search bar at the top. If you want to preview the files, press the icon of theeye present next to the name of each item in the list.
To conclude, click on the button Recover located at the top right and, upon purchase of the full version of the program, indicates the destination folder. Et voila!
How to recover photo cancel from PC