Have you ever wondered how reverse file selection in Windows 10 Explorer, the truth is that it's a fairly simple process but it can be very useful. For this reason we have prepared a guide in which we will teach how to reverse file selection in Windows very easily.
File inversion is one of those features or functions that go unnoticed, in fact the vast majority of people don't know what it refers to. Through the following guide we will tell you what it is about reversing the file selection in the explorer di Windows 10, we will also show you how you can apply it.
Organization is undoubtedly essential to keep our computer in good working order. That said, options like deleting all empty folders and many more will be very useful. Without further ado let's continue in this tutorial on inverted selection.

What is reversing the selection of files in the explorer?
Windows is a very complete operating system with a large number of features, so many can go unnoticed by the most inexperienced users. One you should definitely know about is the so-called inverted selection, something particularly useful in the case of many files.
What is inverted selection or inverted selection?
When we talk about selection inversion, we are referring to a simple process where, after making a specific selection of files, will automatically all those files that are not selected are selected.
This option is particularly useful, as it allows you to effectively select all those files left over from a previous selection. With just one click you can easily organize all the files that are present in one folder on your system.
Another way to help you organize is to sort files by number in the browser. The truth is that both tricks are very useful for having everything much more organized on the computer.
How to reverse file selection in Windows 10 Explorer
Reversing file selection in the browser could be very useful, but as we noted earlier, it's something most people don't know how to do. Even so, don't worry, as the process is very simple and can be done very quickly, to do that, just follow the steps below:
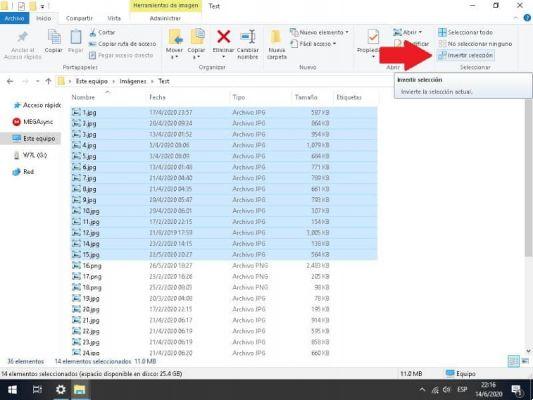
- Once you are inside a folder with multiple files, make the selection you had in mind.
- Now go to the top of the window, there you will find the "Start" section.
- Among the many options, you should look for the one called "Select", you will find it at the end of the top line. Click on it and select "Invert selection".
- When you go through this process, you will notice that all those files not previously selected within the folder are selected.
Note that the process we showed earlier will work even if you change the size of your Windows icons and folders.
Advanced file selection
In addition to inverted selection, we have other options at the time of selection that could be very useful. One of these is the advanced selection, something we can do very easily and that if you are a beginner you should learn.
- Go to the folder where you want to select the files. This type of option is used to very specifically select all desired files.
- For this trick, all you need to do is hold down the "Control" button (Ctrl) and select them one by one or drag the mouse over each of those files you want to select.
- This type of selection is especially useful in case there are files that you don't want to select as a selection, it is undoubtedly one of the most recommended ways to organize files in Windows 10 Explorer.
In short, inverted selection is extremely useful. Even so, if you are not satisfied with the features present, remember that there are some great alternatives to Windows Explorer and some of them have very interesting options.