Sometimes there can be the typical problem where our computer starts suddenly a run slowly, which is a real nuisance since it interferes and prevents us from performing the action we were supposed to do at that moment and even causes our CPU to drastically increase its temperature, the most common thing we do at that moment is turn off the computer , which by the way you shouldn't do as it could cause damage to your computer system in the long run.
The moment your PC starts running slower than it should, you can go to the Windows 10 performance. The Windows Resource Monitor is a tool installed by default in the operating system that most users were unaware of; and this can be very useful when we see a great slowness of our computer.
In this article we will teach you how to see CPU and RAM performance with the performance monitor built into Windows 10, so you can manage the applications on your computer and thus optimize their speed.
What can we do with Windows 10 resource monitoring?
With this tool we will be able to detect the exact moment when your computer is working more than necessary thanks to the excessive use of its graphs, in the same way you will be able to diagnose the processes and applications running at that moment and you will also be able to see how the performance when stopping or closing a process or application .

View CPU and RAM performance with Windows 10 Resource Monitor
Although there are other methods to know the performance of your PC, this time we will focus on performing this action through the performance monitor that the Windows 10 software already offers us for predefined impostazione.
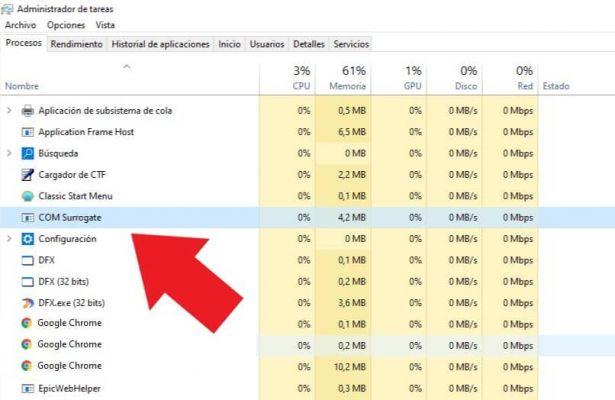
- The first thing you should do is open the Your computer's Task Manager, for this there are three ways to find this tool: you can search for it directly in the Windows menu or in the options menu that appears when you press Control + Alt + Del keys or by pressing Ctrl + Shift + Esc simultaneously to open the Task Manager directly
- Once you have the Task Manager window, you will need to click on the option "more details" located in the lower left corner to view all the programs that your computer is running at that moment.
- After that, more options will appear in the form of tabs at the top, select the option » performance " where it will show you the performance and usage of the CPU, RAM, hard drives, Ethernet connection and graphics installed on your computer, so that you can determine the real cause of the problem.

There is a hidden way to have a simpler view of what we need for the moment that very few users know about; if you want to see a window simply with percentages di performance of each component.
You will simply have to double click on the left column where these components are located, this will minimize the window and show only the percentages.
And if what you want is to see the performance chart of one of the elements, you will simply have to position yourself on the element you want to see, and double click on the graph that is shown so that the window adjusts showing only the performance graph of that component.
This feature is very useful when you want to leave the performance window open, as it shows what you need and doesn't take up much space on your computer's desktop.
If you still have doubts about how to monitor and detect problems that slow down your computer, you can access the help support offered by the Microsoft official site, where it will teach you a step by step guide on how to fix the problem.
The function that each tool has and will also show you the possible causes of the problem. We hope the information in this article will help you.