As you know, since the release of Windows 10 the most talked about topic has been… privacy!
In fact, the operating system offers the user a lot of convenience but it does so at a price that not everyone is willing to pay. In fact, to ensure the correct functioning of the services, it is necessary provide Microsoft with various information on the aptitudes of using the system.
Furthermore, the communication of some details it is accepted (often unknowingly) by the user in the terms of use of the system.
 Privacy in Windows 10: how to protect yourself 2">
Is this situation really as critical as it seems? Is it really impossible to make Windows 10 limit itself to collecting user information while respecting privacy?
The answer is No.: you just need to know where to put the hands.
If you have not yet installed the operating system, remember to choose the Custom settings during installation, di deactivate all the deactivatable and avoid logging in with an account Microsoft.
If, on the other hand, "the damage" is already done and Windows 10 is already ready on your device with the default settings decided by the same company, then you just have to follow the guide below to limit the transit of information between you and the Microsoft server!
Remember, before proceeding, that disabling some or all of the suggested features may lead to some features not working (for example the voice assistant Cortana).
Privacy in Windows 10: how to protect yourself
Step 1: the privacy settings
Strange but true, Microsoft offers in its control panel the possibility to change some privacy settings in a very simple way and without having to fiddle.
The only prerequisite is… to know where to put your hands!
Then we turn on the engines, open the menu or the Start screen and click (or tap) on Settings, then on the Privacy icon.
 Privacy in Windows 10: how to protect yourself 3">
Let's take a look at the side menu (or other panel items, if the window is small).
What I am going to show you are the settings that I believe personally suited to better protect privacy, however, these may need to be further refined depending on the use you make of your machine.
 Privacy in Windows 10: how to protect yourself 4">
From the card Generals, let's be sure to put on "Disabled"The switch at:
- Allow apps to use ad IDs- This will prevent custom ad targeting across Microsoft apps (but won't make ads disappear);
- Activate the SmartScreen filter: this will prevent the URLs from being sent to the Microsoft server for analysis on dubious content;
- Send Microsoft information on how I write: this will prevent you from sending what you keystroke (both physical and virtual) to Microsoft.
Also, by clicking on Manage my Microsoft advertising preferences and other personalization information we will be redirected to one of the Bing pages for further management (and eventual deletion) of cloud-based information.
Let's move now to "Position":
 Privacy in Windows 10: how to protect yourself 5">
Let's click on Modification and we move on Disabled the switch at Location (this will stop Cortana from working).
Let's now take a tour of the items "Camera" and "Microphone", taking care of disable their access to apps unless you actually need it (for example, we can authorize Skype while leaving all the others unauthorized, or totally disable access to the camera and / or microphone setting the main switch to “Off”).
Now, let's go ahead and pay close attention to the next one Speech Recognition, Pen and Typing:
 Privacy in Windows 10: how to protect yourself 8">
We immediately click on Stop About Me and follow the on-screen instructions to proceed.
The sending of voice and typing information to Microsoft will be deactivated, Cortana will be deactivated immediately and the information already collected will be deleted from the device.
However, it is possible that other information collected by the current device (and other devices) is present in the cloud: in this regard, click on "Switch to Bing and manage personal info for all your devices", we log into the Outlook account if we have not already done so and follow the instructions on the page for delete information stored in the cloud (bearing in mind that this will also make them unavailable to all other devices connected to the account).
Let's move now to Account Info:
 Privacy in Windows 10: how to protect yourself 9">
Let's put on "Disabled" the switch next to "Allow apps to access my name, picture and other account info".
Eventually you can selectively choose the apps to allow access using the switches below.
Through the voices Contacts, Calendar, Messaging and Radio you can, by moving the general switches to "Disabled", prevent apps from access the corresponding system components; alternatively, you can selectively choose the apps to grant access to (I recommend that you do so only if you need it, otherwise put everything on "Disabled").
Now let's move on to the section Other devices:
 Privacy in Windows 10: how to protect yourself 10">
To prevent apps from access devices not explicitly associated with Windows 10, put on "Disabled" the switch next to “Allow your apps to automatically share and sync info with wireless devices not explicitly paired with your PC, tablet or phone”.
If you want apps not to use not even trusted devices, you can move on "Disabled" also all of the following switches.
Finally, the last section of the really important “privacy” entry is Feedback and diagnostics: acting on the following switches we will go to limit the collection of data by telemetry - or to inform Microsoft of usage statistics, crashes, problems and anything else concerning the operating system.
 Privacy in Windows 10: how to protect yourself 11">
Without thinking twice and unless we are convinced insiders, we put on "Mai"The dropdown next to" Windows must receive my feedback "and on"Basic" the drop down on "Send data on your device to Microsoft".
In one of the following sections we will go to completely disable telemetry.
For the moment we return to main screen of the Settings panel to proceed with the next step.
Step 2: update and security settings
These will be the rumors that will help us limit how much the system sweeps us out of being updated by making sure to do not share the updates we have with the entire network (the "Optimized Delivery" developed by Microsoft with Windows 10) and the like.
Privacy in Windows 10: how to protect yourself 12">
We then enter the section Update and Security, select "Windows Update" and click on Advanced options, as shown in the picture.
 Privacy in Windows 10: how to protect yourself 13">
From there, we remove the check mark on "Download updates for other Microsoft products while updating Windows ", then click on "Choose how updates are delivered".
 Privacy in Windows 10: how to protect yourself 14">
This is where we are going to prevent you from acting as "distributors" of updates: if you do not want the machine to be able to send updates either on the network or on the Internet, put theswitch on "Disabled".
If instead you want, to minimize download times, the machine can send pieces of updates to other computers on the network, put the check mark on PC in the local network.
 Privacy in Windows 10: how to protect yourself 15">
Let's go back to the "Updates and Security" subsection and enter Windows Defender.
We immediately put on "Disabled" the switch at Cloud-based protection, as well as the next one (Sending sample files) - in the image below both are unavailable as Windows Defender is completely disabled.
 Privacy in Windows 10: how to protect yourself 16">
We're done: let's go back to the main screen of the Settings panel and move on to the next step.
Step 3: the reti
Not everyone knows that Windows 10 can share information on known networks with Outlook account contacts and use those shared by the contacts themselves - information that, of course, passes through Microsoft's servers. In this section we are going to make sure that doesn't happen.
Let's start with getting into the voice Rete and Internet of the Settings panel.
 Privacy in Windows 10: how to protect yourself 17">
We then move on to the Wi-Fi subsection and click on Manage Wi-Fi Settings:
 Privacy in Windows 10: how to protect yourself 18">
At this point we put on Disabled both switches marked in the red square (in practice we totally disable the Wi-Fi sensor, a completely new feature for Windows desktop users but already known to those who use Windows Phone 8.1).
 Privacy in Windows 10: how to protect yourself 19">
Here, too, we're done: let's go back to main window of the Settings panel and let's move on to the next step!
Step 4: Remove Microsoft account from computer
If you still do not feel satisfied and you are regretting having chosen access with a Microsoft account when installing Windows 10 and you want to replace it now with a local account (which therefore gives Microsoft even less data), know that you can do it and proceeding is also quite simple - if you don't want to delete your Microsoft account but just limit synchronization, skip to the end of the section.
We remind you that deleting the Microsoft account will delete the personalizations and mail accounts associated with the profile from Mail. From the main settings panel, click on Account.
 Privacy in Windows 10: how to protect yourself 20">
If necessary, save the open documents (at some point you will have to disconnect to complete the operation), go to the "Your account" and click on "Log in with a local account" and follow the on-screen instructions.
You will be asked for the password of your Microsoft account, after which the procedure for creating and accessing a new account will start.
 Privacy in Windows 10: how to protect yourself 21">
If on the other hand you are not going to delete the Microsoft account entirely but you simply want to avoid syncing with other devices (and thus the dissemination of data to Microsoft servers), you can simply move on Disabled the switch next to “Synchronization settings”.
 Privacy in Windows 10: how to protect yourself 22">
And with the Settings panel we are done: now you can safely close it and move on to the next step!
Step 5: Microsoft Edge
Whether it is your default browser or not, Microsoft Edge can also help send a lot of data to Microsoft servers: in this section we will see how to limit the data sent to a minimum.
Start with open the browser and click on the button menu (the three horizontal dots) at the top right. From there you choose Settings and, in the next panel, go to the bottom and select Show Advanced settings.
 Privacy in Windows 10: how to protect yourself 23">
At this point put on "Activated" the switch to “Send Do Not Track Request”, then up Disabled all the other switches which, in the following images, are marked with an arrow:
 Privacy in Windows 10: how to protect yourself 24">
 Privacy in Windows 10: how to protect yourself 25">
We're done - we can close edge and move on to the next section!
Step 6: completely disable telemetry (Pro, Edu and Enterprise only)
We have already seen in the previous sections what telemetry is for in Windows and we have made sure to limit the information that Windows 10 sends to its servers for diagnostic purposes; in this section we will go to completely disable telemetry in Windows 10.
Note: The following procedure requires editing the registry. Proceed only if you are absolutely sure of what you are doing and be sure to create a full backup of the registry before proceeding to restore in case of problems (guide). We will not be held responsible for any damage caused to the system.
We open the “Run” panel by typing the key combination WIN + R and, inside, we type
regedit
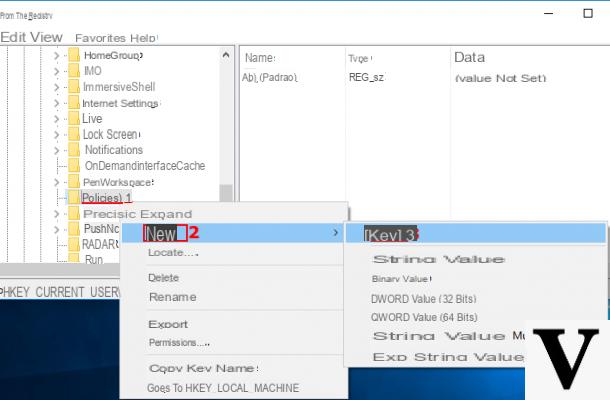
followed by Enter. From the left side of the panel navigate to
HKEY_LOCAL_MACHINESOFTWAREPoliciesMicrosoftWindowsDataCollection
and right click on the key DataCollection, by selecting from the context menu New> DWORD (32-bit) value. Let's give the newly created value its name
AllowTelemetry
and we give enter to confirm. The created value will already be set to 0, so there is no need to proceed further.
 Privacy in Windows 10: how to protect yourself 26">
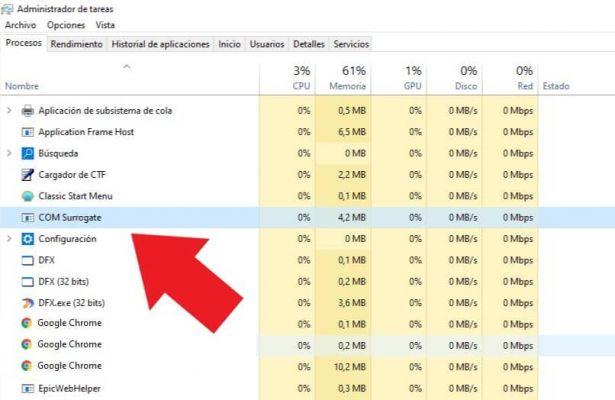
We can close the register; now open the Start menu or the Start screen, right click on File Explorer and select the item Manage.
From the Computer Management window that will open, we navigate (using the left part) in Services and Applications> Services.
 Privacy in Windows 10: how to protect yourself 27">
Now double click on Monitoring Service and, in the window that appears, we move the drop-down menu in correspondence with "Startup type" su Disabled, then we click on Stop.
 Privacy in Windows 10: how to protect yourself 28">
Now Cortana is disabled, the built-in privacy settings cause the system to release minimal information, telemetry is now a thing of the past and eventually disconnected our Microsoft account.
Let's give the computer a nice reboot to make the changed settings in the registry take effect and let's enjoy our system which, from this moment on, will start to mind a little more about its business!
BONUS: tools to manage privacy in Windows 10
In addition to using the settings naturally present in the system, some programmers have written tools that allow you to disable other "hidden" aspects of Windows 10 related to privacy with a series of clicks.
Such programs go to act in the hidden parts of the system (for example files and registry) and, for the most part, all the settings are reversible.
In fairness, however, we must warn you that their use, although apparently effective and harmless, could compromise some system functionality and / or make it behave unexpectedly after an update.
Our recommendation, therefore, is to proceed with caution.