Nowadays fewer and fewer photos are taken and placed on the hard disk of a computer or on the memory of a smartphone without first going through the public limelight of social networks. But you know, before posting a photo online you need to make sure that it is beautiful to look at, otherwise you risk making a bad impression on your followers.
And this is where professional photo editing software, such as the famous Photoshop, as well as mobile apps that allow you to embellish even the most unhappy shots come into play. It must be said, however, that there are also tons of online resources to use for this purpose, including many sites to edit photos, the majority of which are 100% free and compatible with all major web browsers.
How about if I show you some, so you can use it to edit your shots without installing other programs on your PC? Do you want? Very good! Make yourself comfortable, take all the time you need to concentrate on reading this guide, implement the "tips" that I will give you in relation to the use of the tools listed below and you will see that you will be able to edit your photos online without any difficulty . There is nothing left for me to do but wish you good reading and have fun!
Photopea
One of the primi sites to edit photos which I recommend you try is Photopea, a Web application that can be used without necessarily having to register and, above all, without having to resort to the use of additional plugins, since this tool was developed with HTML5 technology. As already mentioned, Photopea is free, but I want to tell you that on its page there are advertising banners (not at all invasive) that can be removed by subscribing to the Premium version of the service, which starts at 9 dollars / month.
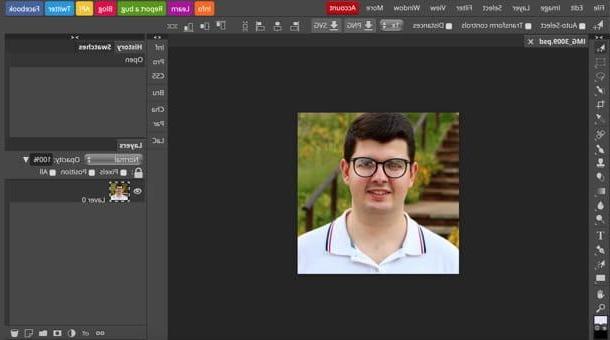
To edit a photo with Photopea, connected to its main page, presses on (X) that appears at the top right to remove the welcome message and translate its interface into British by selecting the item cityno from the menu More > Language (top right). Now, import the photo you want to act on by selecting the item apri from the menu Fillet (top left) and, once you have selected the photo you want to retouch, use the tools located in the box located on the left to edit the image: after selecting one, adjust the degree of intensity from the top menu and use it by acting directly on the photo you have uploaded, which is located in the work area located in the center.
As you have probably already noticed, the Photopea interface is very reminiscent of the "classic" photo editing software: in fact, the service also allows you to manage image levels from the box Layers located on the right side of the page and even manage the history of the various changes made by the panel Story.
When you have finished working on the photo, save your work by selecting the item Export as from the menu Fillet (located at the top left), choose the output format in which you want to export the image (ex. PNG, JPG, SVG, GIF, PDF, etc.) and, finally, presses the button Save to complete the download.
Picozu
Another online service that might do the trick is Picozu, which, like Photopea, is not based on Adobe Flash Player, but on HTML5 technology: this means that it is lighter to load and that it can also be started on computers without Adobe Flash Player (as well as on tablets and other portable devices ).
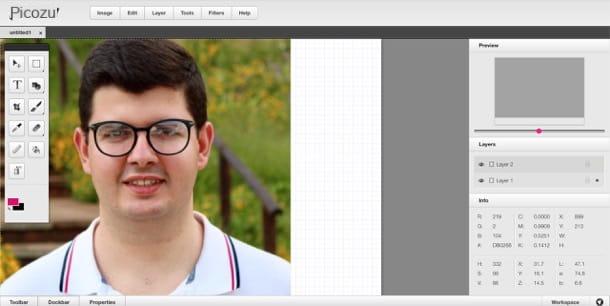
To use Picozu, connected to its main page, press on (X) to close the welcome window that is shown to you, select the item Import > Upload image > Upload Image/Image URL from the menu Image and upload the photo you want to retouch. Once the upload is complete, use the toolbar located on the left side of the screen to activate tools such as brushes, testi e geometric shapes or the menus at the top to access filters e adjustment tools image.
More precisely, in the menu Image find the items to rotate (Rotate) and resize (Resize) the photo, in the menu Edit > Adjustments find tools to adjust color channels and curves while clicking on the item Filters you can access a box with the list of special effects applicable to the shot.
To add a filter to the photo, select one of the categories available in the left sidebar (ex. Adjustments to improve colors and brightness, Blur to increase the blur, Distortion to distort the image in various ways and so on), then click on the preview of an effect and apply the changes by pressing the button OK.
When finished, you can save the output image by selecting the item Save from the menu Image, then choosing the format in which to save the image (eg. PNG, JPEG, etc.) and, finally, by pressing the button OK.
PixEditor
Do you need to apply small corrections to your shots and would like to try an online service that is free of frills, that is, features that you consider "superfluous" or too complicated to use? If so, I recommend you give it a try PixEditor, a very practical and fast online service that allows you to apply "on the fly" simple corrections to photos, such as those relating to the rotation of the image or its cropping.
After connecting to the PixEditor home page, press the button Upload from computer to select the photo you want to customize (or paste theURL of an image taken from the Web in the appropriate text field). When choosing the photo to upload, please note that all major graphic file formats are supported with an upload limit of 2 MB / file.
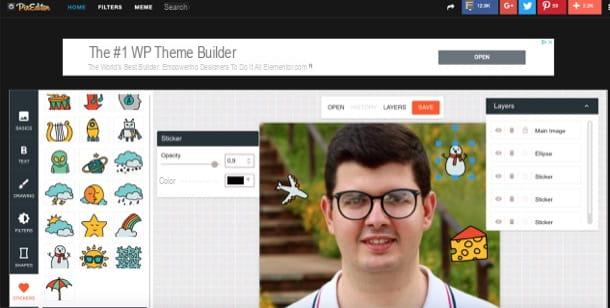
When the loading is complete, press the orange button OPEN, so as to access the editor of the service with which to act on the photo, and then select one of the buttons located on the toolbar located on the left to modify it: Basics, to access the section that includes the tools with which to crop the photo, rotate it, resize it, modify its angles and color; Text, to add text to it; Drawing, to draw on it; Filters, to apply a filter; Shapes, to add shapes and Stikers to apply stickers.
When you are satisfied with the result you have obtained, save the output photo by pressing the orange button SAVE located at the top and, in the box that opens, select the quality of the photo and the download format (JPEG, PNG o JSON) and then press the button again SAVE to download it.
Sumo paint

among the sites to edit photos that I advise you to always keep at hand is also there Sumo paint, which works with any operating system and browser, as long as it supports the Adobe Flash Player plugin. Its interface harks back to that of Photoshop and other major photo editing applications, so you shouldn't find it too difficult to use if you already know such solutions. The Lite version of Sumo Paint does not allow access to all tools: to unlock some you need to register, to unlock them all you need to subscribe to Sumo Paint Pro, which starts at $ 2 / month.
To use Sumo Paint, connected to its home page, click on the link Activate Flash located at the bottom and consent to the use of Adobe Flash Player. Then set the use of the British language by clicking on US flag collocata in alto a sinistra and selects the voice city give the menu to compare.
Now, open the menu Fillet and select the item Opened from my computer to import the photo you want to edit into Sumo Paint. Then use the tools in the toolbar located on the left side of the screen to use i brushes, geometric shapes and all the other tools available such as the clone stamp or the smudge to disguise imperfections in the imported image. Please note that the tools marked PRO are only available to paying users.
At the top of the page, however, you can use the Sumo Paint menus with which to apply some basic corrections to the image: by opening the menu Image you can use the tools with which to resize and rotate the photo; opening the menu Adaptations it is possible to use the tools with which to adjust parameters such as brightness, contrast, colors, etc .; while accessing the menu filters it is possible to apply (if desired) one of the many special effects among those available.
When you are satisfied with the result, you can save the retouched photo to your computer. To do this, select the item Save on my computer from the menu Fillet, put the check mark next to the entry for the file format in which you want to export the image (PNG, JPG, etc.) and presses the button Save but I will complete the operation.
Photoshop Express Editor
In a tutorial dedicated to sites to edit photos, one cannot fail to speak of Photoshop Express Editor, a sort of “Web version” of Photoshop, the famous photo editing software for Windows and macOS. As you can imagine, this service, made available for free by Adobe, allows you to use multiple photo editing tools. It must be said, however, that it only allows you to work on files in JPG format and also requires Adobe Flash Player support.
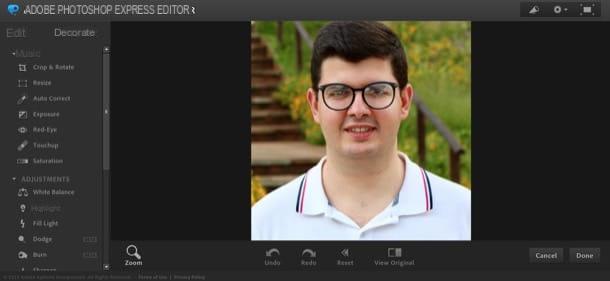
To edit photos with Photoshop Express Editor, you must first connect to its home page, click on the link Start the Editor located at the bottom right and then click on the buttons Upload photo e Upload to select the image you want to upload. Once upload is complete, use the tools located in the bar on the left to retouch the imported photo.
As you can see, the tools are divided into three macro-areas, so as to facilitate their identification: the section Basic it houses the basic tools to crop photos, rotate them and modify their main parameters; the section Adjustment includes tools with which you can change the white balance, light and sharpness; while the section Effects integrates the tools with which to apply various effects to the photo (distortion, pixelated, cartoon, etc.).
When you have finished editing the photo using the tools I just mentioned, save your work by pressing the button Done, located in the lower right corner of the page, and then on the button Save (twice in a row), located in the menu that appears on the screen.
Sites to edit photos