


You have decided to dedicate a small portion of your vacation to reorganizing and storing your photos, but unfortunately you have so many images and so much confusion in your mobile device memory that you don't know where to start. I understand you, but now there are several tools that allow you to archive photos online in an extremely simple way, why not try using one?
How do you say? Would you like to do it but you don't know how to proceed to archive the photos you have taken in the memory of your device? Would you like to use an online photo upload tool but don't want to spend money? And where is the problem? Sure you can. In the course of this guide I will explain how.
If you want to start tidying up the memory of your smartphone you just have to take a few minutes of free time, sit comfortably and carefully read the procedures indicated below. I am sure you will be surprised by the ease of use of the tools I have indicated. I wish you a good reading.
How to archive digital photos on Android
If you want to know how to store digital photos on your Android smartphone or tablet, in the next chapters I will explain how to do this.
How to create a Google account
If you want to store the photos you take on your smartphone or tablet Android, I recommend you to use the app Google Photos which, available for free download, allows you to optimize the internal space of your device, by uploading the images taken and possibly by archiving them.
To use Google Photos on Android it is necessary to have a Google account as, to back up the photos taken via your device online, you need to log in with your Google services account.
In addition, accessing Google Photos through a Google account is also useful for being able to access the web version of the service, view and archive photos even from a computer. Windows o Mac.
As a result, after you download the app Google Photos from the Android Play Store (tap this link to download it) start it by tapping its icon on the home screen or in the drawer and start using it.
At the first start you are asked to log in with the Google account you have. From the moment you are using an Android smartphone or tablet you should already have a Google account, as this is required when setting up the device.
If, on the other hand, you are not sure that you have performed the procedure correctly or would like to proceed with the creation of a Google account, I suggest you read my guide entitled how to create a Google account, in which you can find all the information you need to carry out the preliminary procedure. .
If, on the other hand, you already have a Google account, simply log in indicating your account details (email and password). In the following lines I will explain instead how to use Google Photos to store digital photos.
How to use Google Photos for backup and archiving
After logging in with your Google account in the app Google Photos, you can start using this service on your Android smartphone or tablet to back up your photos online and store them later. The service is free using the 15GB of space available in the account and it is necessary to subscribe to Google One to increase this limit.
In fact, with the associated account, you will be asked if you want to immediately activate the multimedia file backup function. To do this, you can follow the wizard on the screen or skip this step and proceed with the manual configuration of this operation.
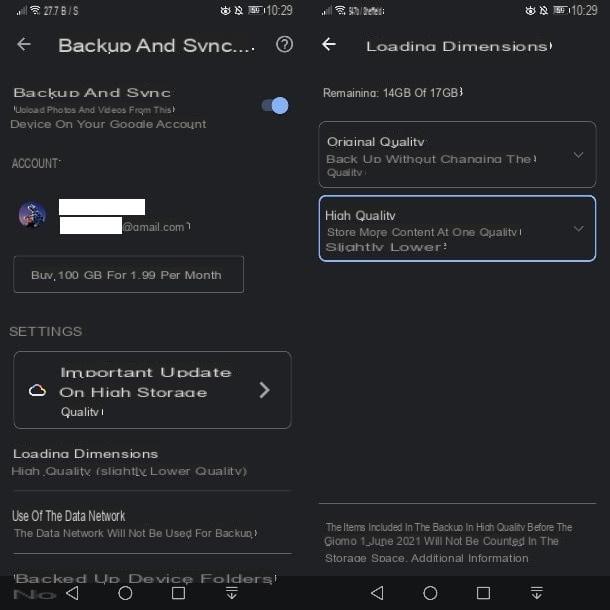
Regarding the latter option, you can proceed in this way: in the main Google Photos screen, tap on the thumbnail and then press the menu item Settings taken a picture. On the next screen, first tap on the wording Backup and synchronization and then make sure it is moved to ON the lever next to the wording of the same name.
You can also tap on items Device folders backed up, to choose which other folders containing multimedia items to synchronize online, and then to the item Dimensioni cartoon.
In the latter case you can see a menu appear asking if you want to back up the photos online in High quality (up to 16MP for photos and up to 1080p for videos) or if in original, that is, without any compression. You may also see the option Express, for uploading photos up to 3MP and videos up to 480p.
Then, under the menu item Use of the data network, choose whether to activate the upload of photos and videos or only one of the two multimedia elements under the SIM data network (pay attention, however, to any additional costs when the thresholds of your tariff plan are exceeded).
Once this procedure is done, you can go back to the Google Photos home screen and find all the photos you took perfectly synchronized in the section Gallery e Collection.
If there are media items in the Google Photos app that you want to archive, you can have them move to the section archive by Google Photos.
This procedure will not carry out any type of deletion of the photos or videos taken, which will only be moved to a specific folder and visible, accessible and editable at any time.
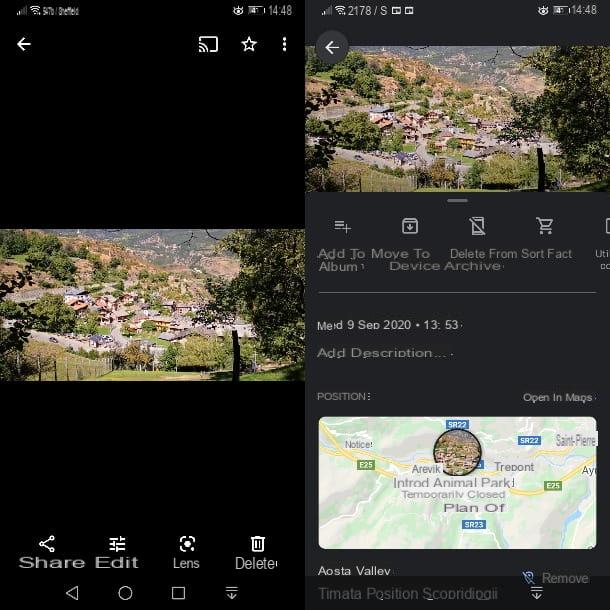
To archive a photo through the Google Photos app, tap on the photo you want and then press the button that presents the three dots symbol and is located in the upper right corner.
At this point, from the menu that is shown below, press on the item Move to archive to store the image you have selected. You can also perform this archiving operation by working with multiple images at the same time.
To do this, tap and hold your finger on the images to select them by making the check mark and then tap the button with the three dots symbol which is located in the upper right corner. From the drop-down menu that you will see appear, select the item Move to archive, to archive multiple media items at the same time.
At any time you can view all the images stored in the section archive by Google Photos. This section can be viewed by tapping on the tab Collection below and identifying the appropriate section among those proposed.
The multimedia elements included here can be easily restored to the main Google Photos folder: just tap on a desired image, press the button with the three dots symbol located at the top right and then select the item Rimuovi dall'archivio.
The archiving procedure for digital photos taken from your Android mobile device can be done in the same way by operating from a computer Windows o Mac.
The Google Photos service is in fact accessible from its official website and, after logging in with the previously created account dedicated to Google services, you can view all the photos uploaded online.
Consequently, if you want to archive photos and want to act from the web version of Google Photos, all you have to do is follow the instructions I just gave you and which concerned the Android version of Google Photos.
Furthermore, I would like to point out the possibility of using Google Photos also on mobile devices equipped with the iOS operating system. The Google Photos application is in fact present at the download free on the App Store and you can use it in the same way for all the operations mentioned in this guide.
How to archive digital photos on iOS
If you have an iOS mobile device and want to store your photos online, you can do so using a native tool that allows you to always have a copy of the photos you take online.
The tool I want to talk to you about in this guide is iCloud, a cloud storage solution developed by Apple that allows you to create a multimedia library consisting of photos and videos accessible online from any connected device.
This tool allows you to optimize the space of the device as the original version of the photo will be uploaded online, while the optimized version will be stored in the internal memory of the device.
However, it should be noted that iCloud's cloud storage space is limited in a way free: the space offered at no cost is 5 GB but if you want to make the most of it, it is recommended to purchase one of the a payment (99 cents / month for 50GB, 2,99 euros / month for 200GB and 9,99 euros / month for 2TB).
To use iCloud correctly and have the ability to store photos online, you need to have an Apple ID, an operation that you should have already completed when configuring your iPhone.
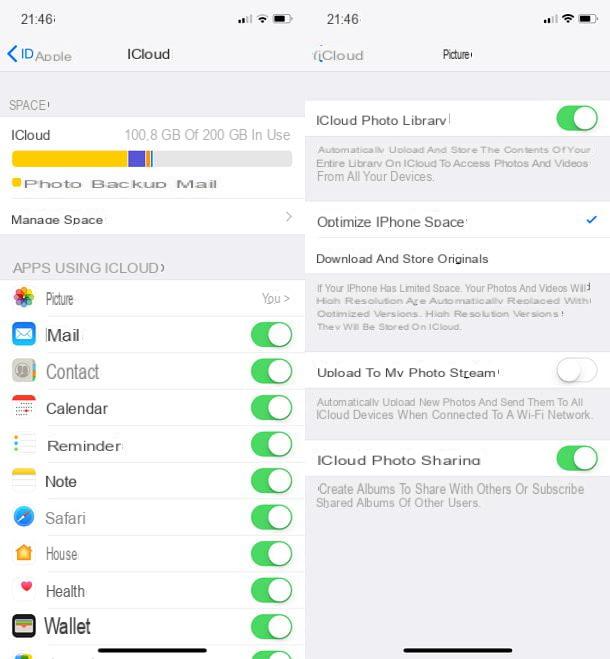
At this point, to configure iCloud and start storing photos online, tap on the app Settings of iOS (symbol of the gear located on the home screen), tap the you don't knowi went his iCloud and make sure that all the items you can see in correspondence with the wording Apps that use iCloud are selected and set to ON.
Also tap on the item Gallery at the item Apps that use iCloud and check that the voices are active ICloud Photo Library, My Photo Stream, Upload Quick Sequence Photos: If not, move the lever from OFF a ON to activate these options.
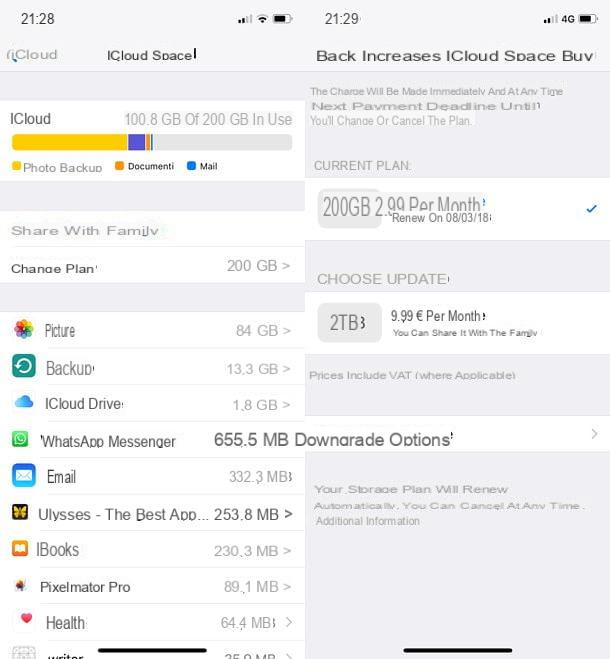
If you want to increase iCloud storage space, by subscribing to one of the paid iCloud plans, go to the Settings App, tap on you don't knowi went his iCloud> Manage Space> Upgrade and choose the plan you want to subscribe according to the space you need.
How to archive digital photos


