


You have taken some shots in public, now you would like to post them online but, before proceeding with their publication, would you like to censor the faces of passers-by who were portrayed in them? Nothing could be easier: just use one of the many functions included in Photoshop, the most famous and appreciated photo editing program in the world. How? I will explain it to you shortly.
Take a few minutes of free time and find out how to censor a photo with Photoshop thanks to the information you find in this guide. I promise you will be able to protect the privacy of the people immortalized in the photos and to post all the shots online much easier than you imagine. In addition to showing you how to do this with the classic desktop version of Photoshop, I will show you how to proceed online and from smartphones and tablets, thanks to the official Adobe apps.
So, can you know why you are still standing there? Courage: make yourself comfortable, take all the time you need to concentrate on reading the next lines and, more importantly, implement the "tips" that I will give you. I wish you good reading and a lot of fun!
How to censor a photo with Photoshop on PC
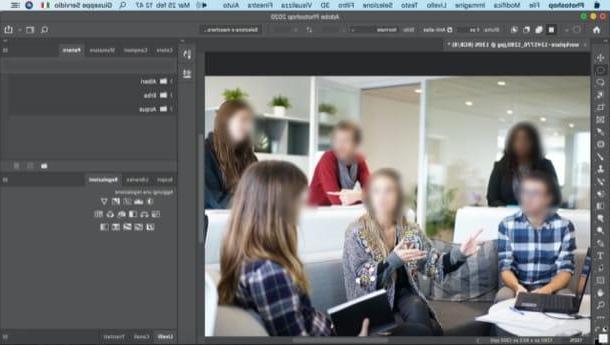
If you want to learn how to censor a photo with Photoshop on PC, the first step you need to take is to open the image to be censored within Photoshop CC (the desktop version of Photoshop, compatible with Windows and macOS): to do this, just click on the item apri present in the menu Fillet, at the top left, and select the image of your interest.
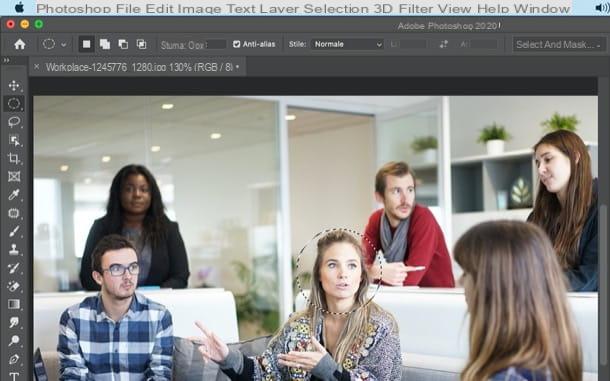
Next, you need to activate the elliptical selection tool from the toolbar located on the left side of the screen, through which you can proceed with the operation you intend to carry out. To proceed, therefore, right-click on Rectangular Marquee Tool and select the item Elliptical Marquee Tool from the menu that appears. At this point, use the mouse to “draw” an ellipse around the face of the person to be obscured in the photo.
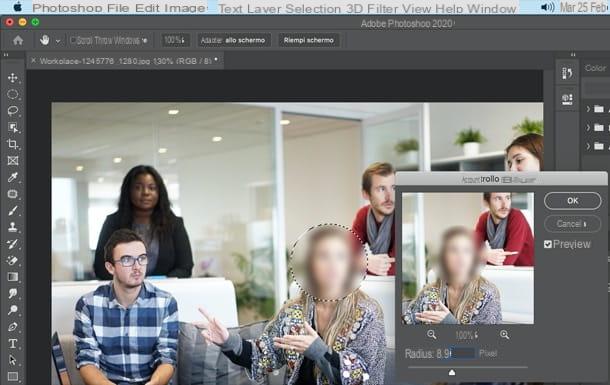
After making your selection, click on the item Gaussian Blur ... contained in the menu Filter> Blur of Photoshop. In the window that opens, move the indicator of the radius to the right (to obtain a value of approx 10 pixels) and click on your button OK, to censor the portion of the image selected previously (in your case, the face of the person to be protected for privacy reasons).
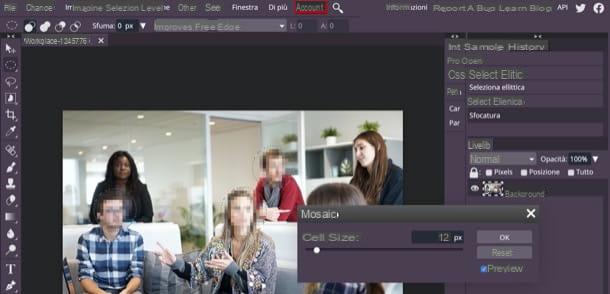
If you prefer to use the mosaic filter instead of the blur filter, go to Filter> Pixelate> Mosaic, moves the cursor located at the wording to the right Cell size and click on the button OK, to censor the portion of the photo previously selected.
As you can see, censoring a shot with Photoshop is very easy. Now all you have to do is repeat the operation you just completed with all the people or portions of the image to be obscured and that's it. When finished, select the item Save with name ... from the menu Fillet of the program and you can save your censored photo to be published online in the file format you prefer (JPG, PNG, BMP, Etc.).
If you have many people / objects to black out within the same photo, you can make a multiple selection (for example of multiple faces) by holding down the key Shift of the keyboard while selecting the elements to be censored one by one.
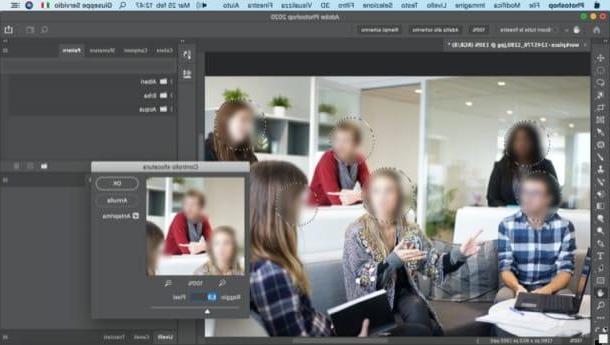
At the end of the multiple selection, go back to the menu Filter> Blur> Gaussian Blur ... or in the menu Filter> Pixelate> Mosaic and, after selecting the intensity of the blur or mosaic filter, save the changes made by clicking on the button OK.
This way, you only have to apply the blur effect once for all the people / objects you want to obscure and you won't have to repeat the operation for every person or item you want to censor. Once the operation is finished, you can save the output image by following the instructions I gave you a moment ago. Convenient, right?
How to censor a photo with Photoshop online
want censor a photo with Photoshop online? Well, in that case you won't be able to take advantage of Adobe's online version of Photoshop, as it doesn't offer tools suitable for the purpose.
However, if your intention is to act from the browser, you can resort to some third-party tools, such as Photopea, a web application developed in HTML5 that perfectly follows the Photoshop interface, incorporates many functions (including the one to obscure faces) and works without registration and without downloading any additional plugins.
Before explaining how it works, I would like to tell you that the service is characterized by advertising banners (not at all invasive), which you can remove if you want by subscribing to the $ 5 / month subscription.
To use Photopea, go to its main page and, if necessary, translate its interface into British, selecting the items More > Language > cittàno of the menu located at the top. Then import the photo to be censored by clicking the button Open from computer located in the center of the page and selecting the shot of your interest.
Next, right click on the Rectangular Marquee Tool located on the toolbar on the left, select the item Elliptical Marquee Tool from the menu that opens and "draw" with the mouse an ellipse around the face you want to censor (if you want to act on multiple faces, remember to hold down the Shift while doing this).
Now, you just have to open the menu Filter, click on the items Blur> Gaussian Blur ... or Pixel effect> Mosaic ... (depending on the result you want to get), move the cursor present in the box that appeared on the screen and click on the button OK.
When you're ready to do so, save the image you censored - open the menu Fillet, select the voice Export as and choose the format in which to export the output photo (ex. JPG, PNG, etc.). Simple, right?
How to censor a photo with Photoshop on smartphones and tablets
want censor a photo with Photoshop on smartphones and tablets? Well, in that case you can take advantage of Photoshop Express, one of the many Photoshop mobile transpositions made available by Adobe, which is available for both Android and iOS / iPadOS.
First, install and start Photoshop Express on your device, see the tabs that illustrate the general operation of the app and then log in with your Adobe ID, your account Google or your account Facebookby pressing the relevant buttons.
Once logged in, grant the app the permissions required to work and select the photo to retouch, by pressing thepreview of one of the shots you have saved in the Gallery. By expanding the menu All the pictures, top left, you can take the photo using the camera of your device, take it from Lightroom, from your account Creative Cloud, etc.
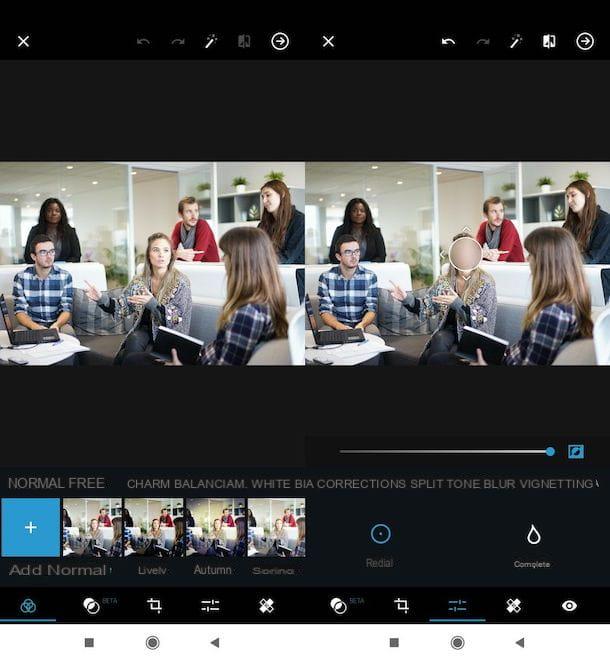
After selecting the photo to retouch, tap on the symbol of adjustment bars (bottom right), select the tab Blur e fai tap sul pulsating radial (if necessary). At this point, move the cursor at the bottom and tap on the icon square with the circle inside to invert the selection.
Now, move the blur effect indicator (the one with the two circles and the four arrows) on the face of the subject you want to censor: keep your finger pressed on it and move it to the desired point. Finally, refine the blur effect applied by matching the two circles: move one of the arrows placed on the dotted circle towards the edge of the continuous circle or, conversely, move one of the arrows on the continuous circle towards the edge of the dotted circle.
When you are ready to do so, save the output image by pressing the icon of freccia rivolta verse destra (top right) and select the save / share option you prefer to use.
If you have an iPad, I recommend you try the iPadOS version of Photoshop, which combines some of the main Photoshop desktop functions with features designed for the iPad touch screen, including accessories compatible with some high-end models of the tablet. “Made in Cupertino”, Apple Pencil first and foremost. The app is free for one month, then it costs 10,99 euro / month.
How to censor a photo with Photoshop


