Samba is one of the great alternatives that exist for share files in hybrid environments in which coexist Windows and Linux computers. It is only necessary to install and configure the application in Ubuntu from the terminal.
Samba is nothing more than a communication protocol which allows computers running Windows to connect to the Linux file system. This way you can access Linux folders, files and network drives on Windows.
Requirements to install Samba on Ubuntu
- Ubuntu operating system version 18.04 onwards
- Permissions administrator user to access the Sudo application
- Internet access
- A terminal with a Windows operating system to test the configuration
How to install and configure Samba
Now that we have everything we need to get started with installing the application, it's time to write the necessary commands. Try not to skip any steps.
Samba installation
- Log in to Sudo and enter the command to start the Samba installation. sudo apt install samba samba-common python-dnspython.
- To start the download, enter the letter S.
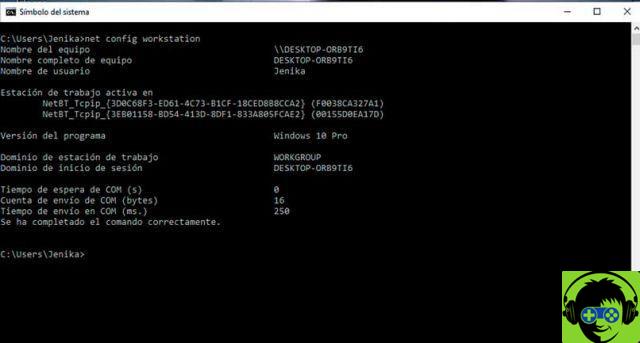
Check the workgroup in the Windows terminal
- One way to check the workgroup is to right-click the This Computer icon and then choose the Properties option.
- Using the Windows command prompt, you can verify the workgroup and domain by entering the command net config workstation. We will use it later to configure the smb.conf file.
Edit the smb.conf file
- Backs up the smb.conf file in case of an error. Type the command sudo cp /etc/samba/smb.conf /etc/samba/smb.conf.orig.
- Now you can edit the file. Set secure file transfer settings with the command secure file sharing
- Set the value of anonymous insecure by entering Sudo unsecure Anonymous
- Create the directory where the files are shared by typing sudo mkdir -p /srv/samba/anonymous_shares
- Now add file access permissions with commands sudo chmod -R 0775 / srv / samba / anonymous_shares e sudo chown -R none: nogroup / srv / samba / anonymous_shares
Edit the configuration file
- Access the configuration file from an editor and change the values vi: sudo vi /etc/samba/smb.conf e nano: sudo nano /etc/samba/smb.conf
- Edit the directives in the Global section of the file. Set the following values: workgroup = WORKGROUP,netbios name= ubuntuX, security = user
[Anonymous]
how = Anonymous File Server Share, path = / srv / samba / Anonymous_shares, browsable = yes, writeable = yes, guest okay = yes, read solo = No., user force = no - Finally save the changes made to the file with the key combination Ctrl + O and exit the editor.
- To verify that everything is working correctly, run the command testparm.
Select shared folder
- Select or create the folder you want to make available for terminals with Windows 10.
- Click the folder once, then right-click to select the option Local network sharing.
- The Folder Sharing window opens to enable the option Share this folder. The other available options are automatically enabled and to end press the button Create Share.
- Finish the process by clicking Automatically add permissions.
- The folder will appear with an arrow next to the folder icon to indicate that it is a shared folder. Do the same process with the folders you want to share.
Advantages of using Samba
Samba was created by Andrew Tridgell and it did so through reverse engineering. I create the compatibility of Unix environments using traffic grabbers very similar to Wireshark.
Using samba you choose what you want to share and how you want to share it. Initially use anonymous shares, where you share any content without restrictions and in other cases you can protect files with login data.