


You just switched to Mac, you feel comfortable, but you have not yet managed to familiarize yourself with all the functions of your new work environment. Now, for example, a friend has asked you to send him a screenshot of a Web page and you - who on Windows were used to using the classic Print Screen key - find yourself in trouble because you don't know how to do it.
Don't panic, my friend! I'll give you the good news right away: to take screenshots of the desktop, portions of the screen or single windows on macOS, you don't need to install any additional programs, you can do everything using the screen capture feature included in the operating system. If you want to know more and want to learn how to photograph Mac screen, read on, you will find everything explained below.
I anticipate that this is really a breeze, all you have to do is memorize some key combinations from the keyboard and learn some commands from the terminal that, if you need them, could allow you to change the format and appearance of your screenshots . Time just a few minutes and then it will all come naturally to you, you'll see.
Photographing the Mac screen (or individual windows)
Are you ready to find out how to photograph Mac screen? Well, then let's get to work right away! To take a screenshot of thefull screen, all you have to do is press the key combination cmd + shift + 3 on your Mac keyboard and an image in PNG format with the “photo” of the desktop will be automatically saved on the macOS desktop. The correct execution of the command is signaled by the reproduction of the sound of a camera.
To capture individual portions of the screen, you have to press the key combination instead cmd + shift + 4 on your Mac keyboard and mark the area of the desktop to be “photographed” by holding down the left mouse button (and then releasing it to take the shot). The same key combination should be used when you want to take a screenshot of one single window, but instead of selecting the portion of the screen to be captured with the mouse, press the space bar on the keyboard and then click on the window to "immortalize". The resulting image will have a very professional shadow effect.
If you are using a version of macOS equal to or later than 10.14 (Mojave), after taking a screenshot, you will see a thumbnail of it appear in the lower right corner of the screen. By clicking on the thumbnail in question, you can quickly edit or share the screenshot.
To edit the screenshot, all you have to do is select the editing tools (eg. geometric shapes, text fields, arrows etc.) listed at the top left of the window that opens, while to share it online you will have to click on the icon sharing (the square with the arrow inside) located at the top right.
Alternative method

Don't love keyboard shortcuts? Then go to the Mac Launchpad, open the folder Other and start Screenshot: this is another utility included "standard" in macOS that allows you to take screenshots on Mac using the mouse directly. It also allows you to make videos of your computer desktop, all in a few clicks.
The operation of Snapshot is extremely intuitive. Its toolbar contains various buttons: the first three allow you to create a screenshot of the Mac desktop, of a single window or one portion of the screen. The buttons follow for record a video of what happens on the Mac screen or a portion of the desktop; after which there is the button options, which allows you to adjust various advanced settings related to the capture of screenshots: it allows, for example, to choose whether show the mouse pointer in screen captures, if show the floating thumbnail of the screenshots after their creation, to set a timer to delay the screen capture and to choose the folder in which to save the screenshots. To take a screenshot with Snapshot, just choose the capture mode that best suits your needs and click on the button Acquire: that's all.
If you are using a version of macOS earlier than 10.14 (Mojave), you can take advantage of a reduced version of Screenshot, which does not support video recording and does not allow you to adjust advanced preferences for capturing screenshots. Here's how it works: after starting the application, click on its icon that appears in the Dock bar (le scissors) and select one of the four options available in the menu Shoot, top left.
- Selection to take a screenshot of a portion of the screen.
- Window to take a screenshot of a single window.
- Screen to take a snapshot of the entire Mac screen.
- Screen with timer to create a screenshot 10 seconds later than when you give the command.
When the operation is completed, a preview of the screenshot just made will open. To save it, select the entry Save from the menu Fillet Preview, top left.
If you want, you can also include the mouse cursor . To activate this function, select the item Pref Renze from the menu Snapshot (top left) and click on the style you want to apply to the cursor to include in the screenshots (e.g. arrow or hand).
Save the screenshots to the clipboard

It is also possible to create screenshots and copy them directly to the system clipboard instead of saving them as images on the desktop: an operation that can be useful when you want to paste screenshots of a program or desktop photos on the fly into a text document, a 'email or in other apps.
To copy the screenshots to the macOS clipboard just use the same key combinations seen previously by adding the key to them ctrl. In other words, if you want to copy the desktop snapshot to the clipboard you have to press cmd+ctrl+shift+3 while if you want to capture a single window or a portion of the screen you have to resort to the combination cmd+ctrl+shift+4.
When the operation is completed, open the application in which to paste the screenshot (eg. Mail, Pages, Notes) and press the key combination cmd + v to paste the image into the target document. If you don't want to use the key combination from the keyboard you can invoke the command Paste also from the menu Modification or from the menu of the click destro, it's the same thing.
Change Mac screenshot format
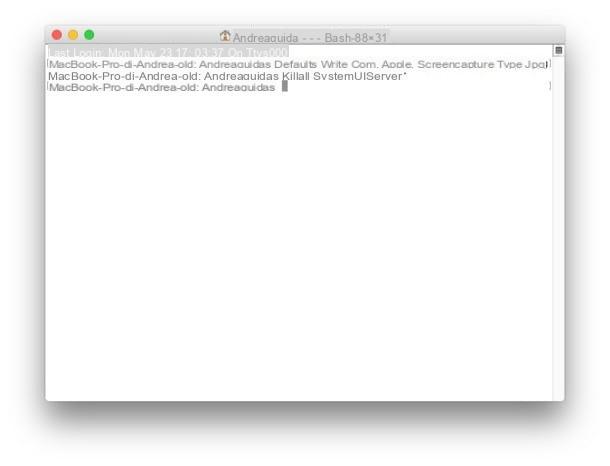
As mentioned earlier, macOS by default saves screenshots in PNG format by applying an elegant shadow effect to those portraying single windows. If you want, however, you can change these parameters using simple commands from the terminal (utility similar to the Windows Command Prompt which you can find in the folder Other Launchpad). To change the file format in which macOS saves screen snapshots, use the following Terminal command.
defaults write com.apple.screencapture type format
Instead of the term format you have to type the extension of the file format in which you intend to save the screenshots: formats are supported JPG, BMP, TUF, TGA, JP2, PICT, PNG e PDF. The changes affect both full-screen screenshots and screenshots of individual windows and individual portions of the desktop.
To make the settings effective, you must give the command killall SystemUIServer, after which all the icons in the Mac menu bar will be reloaded.
Please note: screenshots in JPG or BMP format have no transparency, they have a white background. To restore the creation of snapshots in PNG format you can use the same command by typing PNG instead of format.
Turn off screenshot shading

Don't like the shadow effect that macOS applies to individual window snapshots? No problem. You can turn off shading with this command, which applies to all file formats.
defaults write com.apple.screencapture disable-shadow -bool true
For the changes to take effect, issue the killall SystemUIServer command. All icons in the Mac menu bar will disappear for a moment.
This is the command to use if you change your mind and want to restore the shading.
defaults write com.apple.screencapture disable-shadow -bool false
Change the name and destination folder of the screenshots
By default, macOS saves all snapshots on the desktop and names them “Screenshot” (followed by the date and time of creation). These parameters can also be changed easily with Terminal commands.
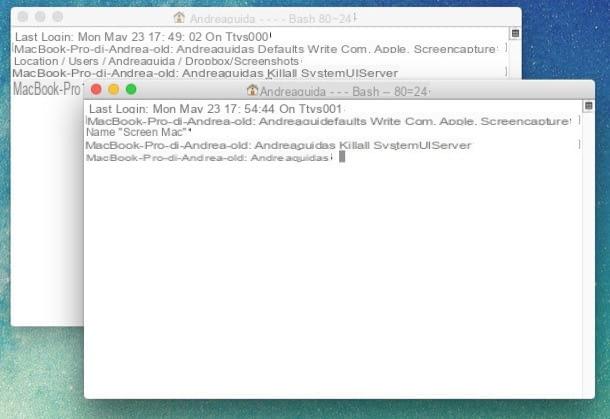
- To change the destination folder of the screenshots type defaults write com.apple.screencapture location folder where instead of folder you must enter the complete path of the folder in which to save the images. If you don't want to waste time manually typing the destination path for the screenshots, drag the folder to the Terminal. Its path will automatically appear on the command line.
- To set the default name of the snapshots, give the command defaults write com.apple.screencapture name "file name" where instead of the file name you have to type the name you want to assign to the screenshots (if the name consists of a single term you can also avoid using quotation marks).
To make the changes effective, you must give the command killall SystemUIServer which will reload all the icons in the Mac menu bar.
Change the key combination to take a screenshot on Mac
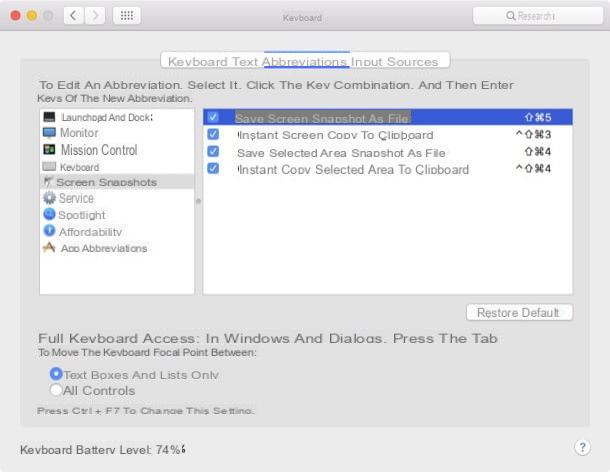
You would like to change the key combinations that allow you to Mac screen photograph? There is no problem. You open System preference (the gear icon located in the macOS Dock bar) and select the item Keyboard from the window that opens.
Now move to the tab Abbreviations, select the voice Screen snapshots from the left sidebar and click on the key combination corresponding to the command you want to change.
- Save screenshot as file if you want to change the key combination to take a screenshot of the Mac screen.
- Instant copy screen to clipboard if you want to change the key combination to copy the Mac desktop to the clipboard.
- Save snapshot of selected area as file if you want to change the key combination to "photograph" a single window or a portion of the screen.
- Instant copy selected area to clipboard if you want to change the key combination to save a single window or a portion of the Mac screen to the clipboard.
After clicking on the key combination to change, press the new key combination you want to use and that's it. You'll see the new keyboard shortcut appear next to the command name, in place of the old one.
In case of second thoughts you can restore the default key combinations (the ones I showed you at the beginning of the tutorial) by clicking on the button Restore default which is located at the bottom right.
Edit screenshots on Mac
Once finished photograph the Mac screen, you can quickly edit the screenshots obtained with Preview, the default software for opening photos and PDF files that is also available in macOS versions that do not allow you to edit screenshots "on the fly" by clicking on the thumbnails that appear in the corner of the screen.
The operation of the software is extremely intuitive: you find all the main editing tools in the program toolbar and in the menu bar. For example, you can adjust the size of the images by selecting the item Adjust size from the menu Instruments or insert lines, squares and writings in the screenshots by first clicking on the icon carrying case (top right) and then on the desired tool in the toolbar that appears in the software window.
When you are satisfied with the result, you can export your edited screenshot as a PNG, JPG or even PDF file by selecting the item Export from the menu Fillet. If you are using a version of Mac macOS equal to or later than Lion, you can also count on the automatic save function which records all changes made to an image directly on the original file.
To restore the old version of a screenshot after editing it, go to the menu File> Reset to… Preview and choose if restore the previous version from the file or se browse all versions screenshots available for recovery.
If Preview does not fully satisfy you, you can try to edit your screenshots with Evernote's Skitch, a free application that allows you to photograph the Mac screen and edit the screenshots with arrows, writings and so on. The software is available on the Mac App Store and is extremely intuitive, you will not encounter any difficulties in using it.
How to photograph the Mac screen


