


For Christmas you have given or received a new one as a gift Android smartphone? You or an acquaintance of yours do not know how to complete the first configuration? Or you want to be sure that everything is done correctly to make sure you understand and correctly complete the initial configuration? Here you will find all the information for do the initial setup of an Android smartphone.
In this guide we have considered those smartphones that use Android Stock, the pure version also called vanilla that you find in Google Pixel and all devices that belong to the Android One program. The guide is based on the Pixel series devices based on Android 9.0 Pie, but it is also perfectly valid for those based on past and new versions of Android. If your smartphone is Samsung or Huawei branded, however, we have created specific guides:
- How to set up a new Samsung smartphone;
- How to set up a new Huawei smartphone;
Throughout the guide you will find many explanatory images and some passages that are not present if you are performing the initial setup of an Android smartphone different from a Google Pixel, but you can simply move on and move on to the next step, without fear of making a mistake.
Index:
- How to set up a new Android smartphone
- How to customize an Android smartphone
- How to install new applications
- How to uninstall applications
Useful guide for setting up a new Android smartphone
Arriving…
0. Back up your smartphone
If the one you are about to configure is not your first Android smartphone, you may want to make a backup of your data to be able to find it in the new device. We are not referring only to the backup obtainable with the Google account, which allows you to have a copy of contacts, appointments and e-mails, but also a copy of the applications and their content.
In particular, you must remember to back up your SMS, WhatsApp conversations, the configuration of your launcher or your photos. For this we have prepared a complete guide, which will explain how to make backup copies of your data, both via PC and via smartphone, with different modes suitable for both beginners and more experienced users, without forgetting the possibility of saving the data on the cloud. Here is the link to the backup guide, to be followed before proceeding with the configuration of your Android smartphone.
Data backup on Android: what it is and how to do it
1. How to set up a new Android smartphone
 The initial step is to charge the smartphone, to make sure you have enough autonomy to complete the entire operation without the smartphone turning off in the meantime. Usually new smartphones arrive with a fair percentage of charge, but to avoid any inconvenience it is advisable to leave it charging until the notification LED, usually located in the upper frame of the smartphone, turns green. By connecting the smartphone to its charger without turning it on, you should still see an indicator on the screen that shows you the current battery level and allows you to follow the charging status.
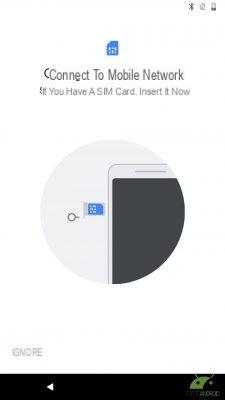
Before turning on the smartphone it is advisable to insert the new SIM, in order to complete all the following steps correctly. It must be said that it is not a mandatory step but the wizard of each Android smartphone it begins by remembering this operation. You must therefore take the pin present in the sales package, extract the SIM trolley and check that you have the SIM of the correct format. Usually the telephone operators provide the SIM in trio version, so you just need to select the size supported by your smartphone, usually the smallest nano size, and insert it paying attention to the small gap that will avoid you inserting it in the wrong direction.
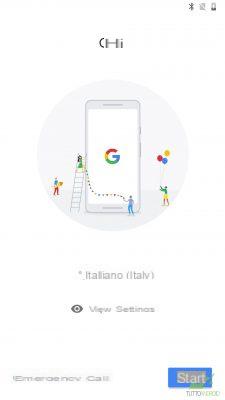
At this point you just have to turn on the smartphone by holding down the power button usually located on the right side for a few seconds. The ignition is confirmed by a small vibration and after a few seconds the smartphone shows the home screen. If you have inserted a SIM, the system automatically recognizes the language, otherwise the procedure asks you in which language to continue to complete the procedure.
1.1 Connectivity
The first step of the initial setup of an Android smartphone, whether you have inserted a SIM or not, is about WiFi connectivity. In fact, it is recommended to connect to a wireless network to complete the first phase, since the procedure looks for any system updates and could consume a considerable amount of data included in your telephone offers.
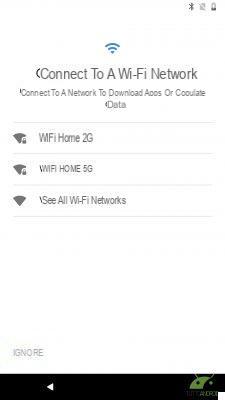
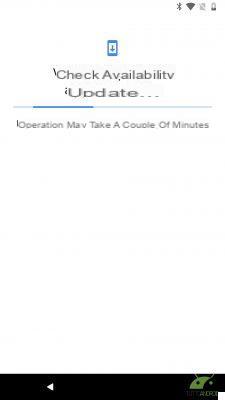
configure the WiFi network on your Android smartphone you simply have to touch the name of the network you want to connect to, choosing it from those that are shown to you. At this point you have to enter the password, if any, paying attention to the upper and lower case letters and pressing the Connect button. In this case and in all those where there is data to be entered, just touch the empty space to bring up the virtual keyboard on the screen, which allows you to enter passwords and information. The system performs a search to check for any updates that are installed automatically before continuing. On some Android smartphones, the WiFi connection configuration screen may be proposed after the one we are about to describe.
1.2 Copy apps and data
Do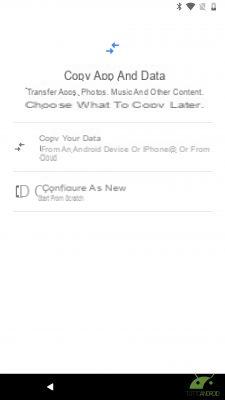 after you are connected to a WiFi network, you must indicate to the procedure if you want to start a clean configuration, perfect if this is your first Android smartphone or you do not want to transfer any data from the old one, or vice versa choose to transfer data and settings from another device Android or from an iPhone. If you don't want to recover data and settings or this is your first Android smartphone, you can go directly to the next step.
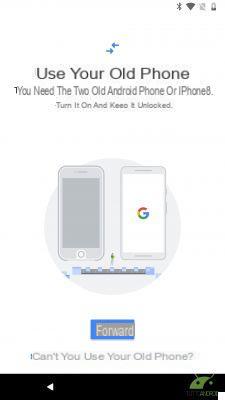
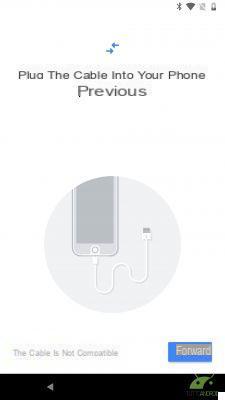
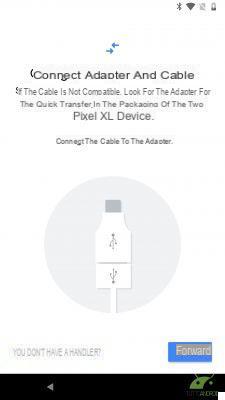
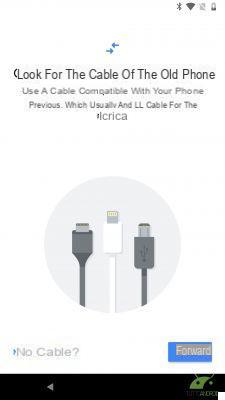
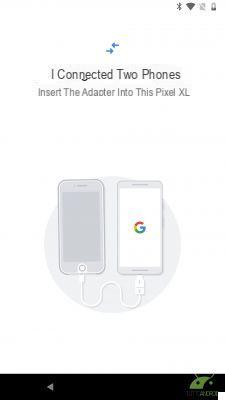
If your new smartphone is a device of the Google Pixel family, you can complete the procedure using the special adapter supplied in the package that allows you to transfer data using the USB charging cable of the old smartphone.
In any case, you can complete the procedure via WiFi, following the instructions provided by Google if you come from an iPhone or an iPad, or simply using your Google account to restore the backup made on the old device, and stored in the Google cloud.
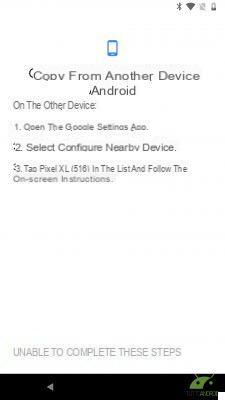
If you want to transfer data from the old Android smartphone you have to open the Google Settings application on the latter, or search for the Google entry in the Settings, select Configure nearby device and choose the name that is shown on the screen.


Previous
Next
Fullscreen


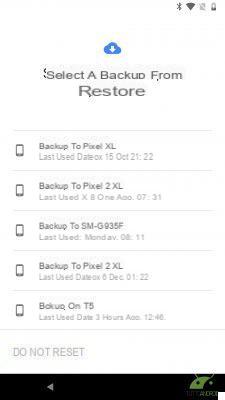
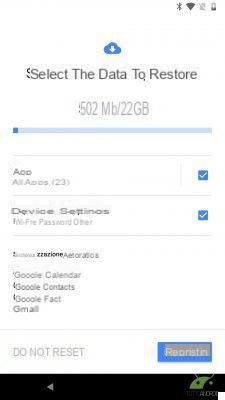
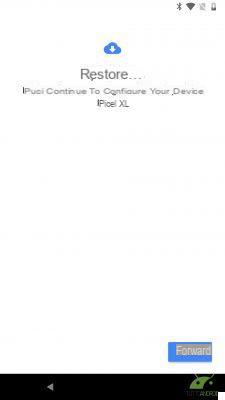
At this point you have to decide which applications and settings to transfer by selecting them from the appropriate list. If you have decided to recover a backup from a Google account you must obviously enter your username and password, select the backup from those in the cloud, and then the data to restore. While the data is being restored, you can continue with the wizard, although first we will analyze the configuration of the Google account, which is required even if you have decided to proceed with the configuration from scratch.

Previous
Next
Fullscreen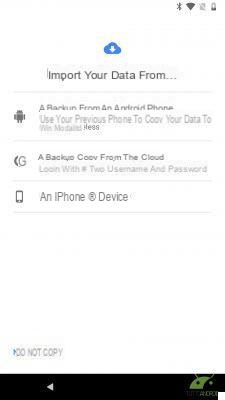


1.3 Account Google
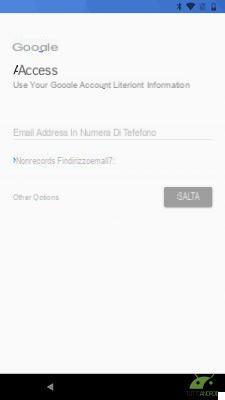
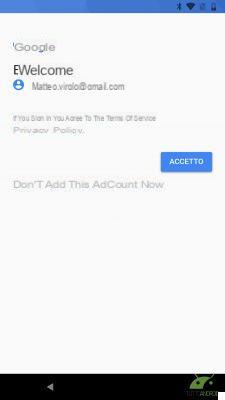
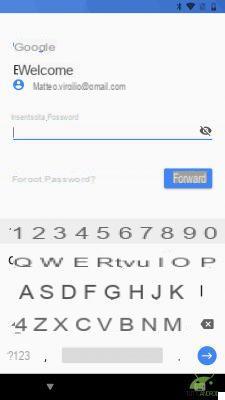
One of the key aspects of an Android smartphone is the presence of Google services, which allow us to always have telephone contacts, photos, calendar, e-mail and many other information available, without having to worry about saving and transferring them later. If you already own a Google account it is time to enter the relevant data, if instead it is your first experience in the Google world you have to create a new account, following the procedure accessible by tapping on the word “Or create a new account“. You must enter your name and surname, date of birth and gender and choose your new email address, with the extension “@ gmail.com” and choose the password, which must be at least eight characters long. At this point, if the smartphone uses Nougat, you could find the details of the Google services to be activated, while with Oreo the procedure takes place later. However, you can find the details in point 1.5.1.


Previous
Next
Fullscreen


If you have not inserted a SIM, the procedure asks you to indicate the time and date, while with the SIM inserted the step is skipped, since this information is retrieved autonomously from the cellular network. You can then go to the next step.
1.4 Configure device security
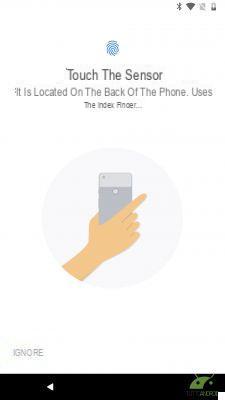
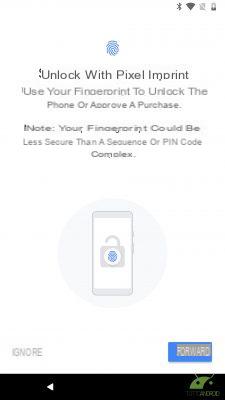 Currently stock Android devices only allow you to unlock by fingerprint or using one of the classic methods, namely Pattern, PIN or password. Almost all new smartphones have a fingerprint reader while some may have other systems, such as face recognition or iris recognition. It is difficult to say which is the best, since there is no better unlocking method, so you have to evaluate which one you think is more reliable. In this guide we illustrate the steps to configure the fingerprint unlock, the only one officially supported by Google, which must be combined with one of the three classic methods to access the alternative unlock screen in case of non-recognition of the fingerprint.
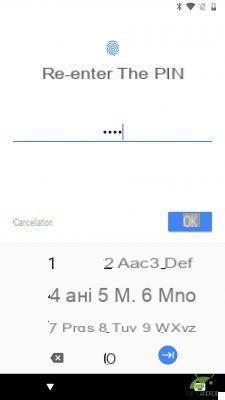
You will first need to configure the secondary unlock method by entering your PIN, password or unlock pattern. At this point you must follow the instructions on the screen by placing your finger on the fingerprint reader and lifting it and resting it repeatedly by varying the position of the finger. If you are carrying out the procedure correctly you should feel a slight vibration while if you are doing something wrong it is necessary to position your finger correctly.


Previous
Next
Fullscreen
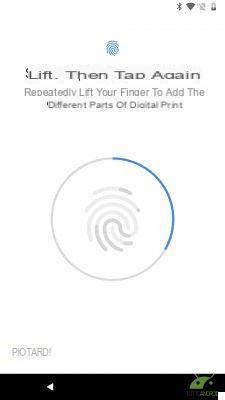
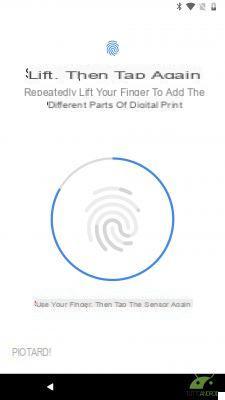
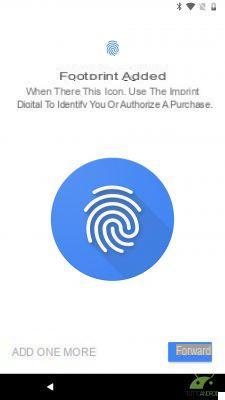
After collecting a sufficient number of samples, the procedure asks you if you want to register more fingerprints or to proceed. You can safely continue and register the prints of other fingers at a later time, for greater comfort depending on the situation in which you find yourself.
1.5 Configure Google Assistant
The next step of the initial setup of an Android smartphone is dedicated to the Google Assistant, available for some time also in national. Also in this case you can ignore the configuration and carry it out later, but we advise you to proceed immediately to fully exploit the potential of your new Android smartphone.


Previous
Next
Fullscreen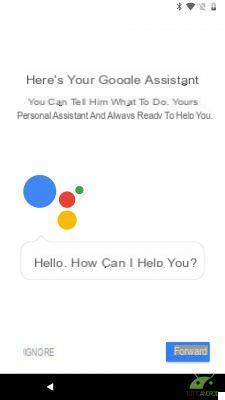
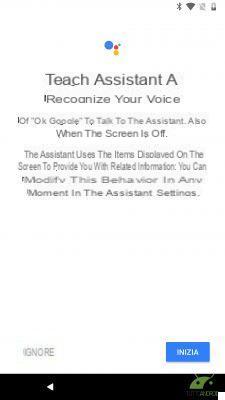
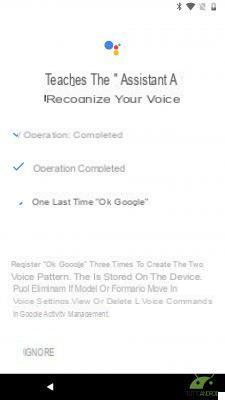


The first step is obviously to teach the assistant to recognize your voice, so you have to say the phrase OK Google three times and choose whether to use the hotword to unlock the phone and start using it with voice commands.
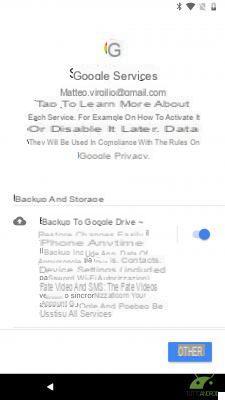
1.5.1 Google services activation
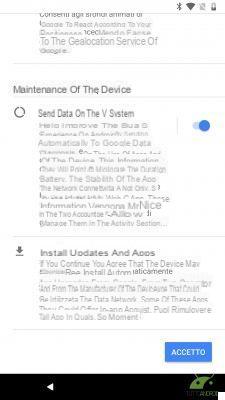
The time has come to decide which Google services to activate. For each of them find the description in order to have a clear idea of what you are doing. There is the Backup and storage section to save personal data and those of applications on the cloud, the Location section to activate the geolocation service, using mobile and WiFi networks, as well as GPS, to establish your position. You can decide whether to contribute anonymously to the improvement of the Android experience by sending diagnostic data to Google and receiving news and offers related to Google Play.
1.6 Optional configurations
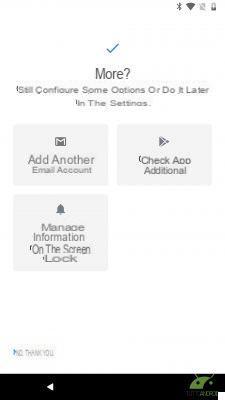
We are almost at the end of the first part of the initial setup of the Android smartphone, with the indicated procedure that allows you to add another email account, manage information on the lock screen or check additional apps. Once again these are optional operations, which can be completed later through the application Settings.
After completing any additional operations, again through clear and simple guided procedures, you can complete the first part by choosing the item "No thanks" or "Configure later". The system may process some data when finished takes you to the Android home screen.

2. How to customize the Android smartphone
A smartphone with stock Android is practically devoid of customizations, with only Google applications to which, in the case of devices with Android One, some can be added. So let's go and see how to customize an android smartphone making your new smartphone look more personal by changing the wallpaper, changing the notification bar, selecting a ringtone for calls, notifications and alarms.
In this section we also explain how to add elements to the Home Screen, how to change the display settings, for example by customizing the font size and adjusting the brightness.
2.1 Home screen
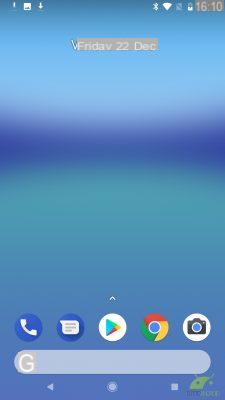
Each time the smartphone is turned on or unlocked, you are in front of the home page, also called Home, which may differ depending on the Launcher used. In this guide we always talk about the Pixel Launcher, installed as standard on the devices of the range Google Pixel and there may be some differences with respect to the launcher present on Android One family devices, which use a less advanced launcher. In any case, you can always install an alternative launcher at a later time, such as Action Launcher or the evergreen Nova Launcher.
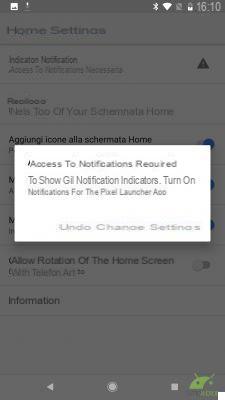
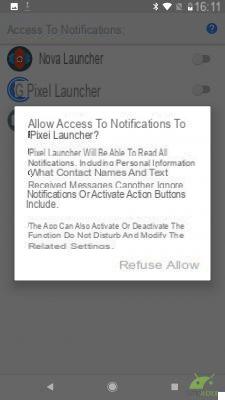
From Android 8.0 Oreo Google has further evolved the notification dot, which allows you to show notifications related to each application with a colored dot on each of them. Pixel Launcher must be granted permissions to access notifications. To view this screen and to access the menu that allows you to change the appearance of the launcher, just long press on an empty spot on the home screen and select the Home Settings item.
2.1.1 How to add icons to the home screen
At the first start you will find only the icons in the dock, with links to the Phone application, messages, the Play Store, Google Chrome and the camera. On Android One devices you will also find some folders with links to some Google applications, such as Gmail, Maps and others.
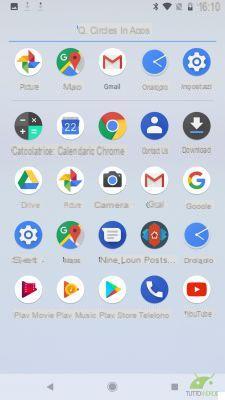
With a swipe upwards, then sliding your finger on the screen towards the top, you can access the application drawer, in which you will find all the applications installed on your smartphone. For convenience, you can create shortcuts to the applications you use most on the home screen, which can be divided into multiple screens, accessible by scrolling horizontally. The launcher initially shows only one screen but you can decide at your discretion whether to place them on other pages, in order to have a more comfortable organization.

To create a link in the home screen just hold down on the application you are interested in and drag it in any direction to see the main page of the home screen appear. Placing it on top of an existing icon creates a new folder, while by dragging it to the right edge you can place it on a page other than the main one.
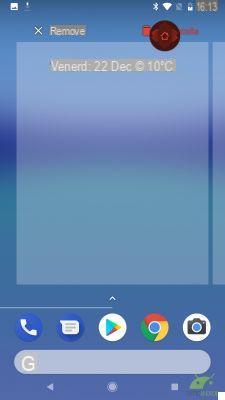
With a long press on an empty space on the home screen you can add a widget by selecting the appropriate button and choosing the preferred one. A widget is a small window in which some information from its application is displayed, such as the most recent emails, SMS, a contact list and much more.
2.1.2 How to change the wallpaper on an Android smartphone
At the first start the home screen shows an image chosen by Google, which can change depending on the version of Android installed on your smartphone. It is however possible to change it in a very simple way, choosing it from the preloaded ones or using an image taken with the smartphone camera in the gallery.
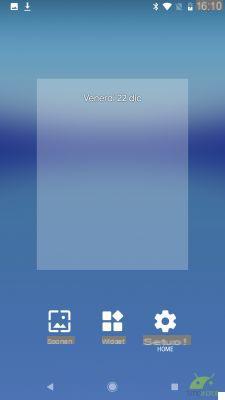
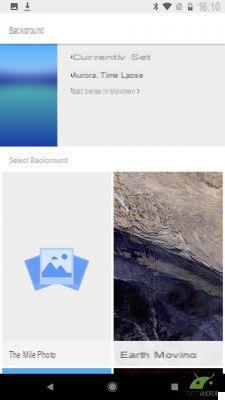
Once again a long press on an empty space on the home screen is enough and press the Wallpapers icon. The next screen shows the screen currently set and a series of images to choose from, divided between My Photos and the other wallpapers. Just scroll through the available images, select your favorite one and press the top "Set as wallpaper". You can decide whether to use the image as the background of the home screen, the unlock screen or both, a choice that we recommend for a more uniform appearance of the system.
2.1.3 How to change the ringtone of an Android smartphone
One of the first customizations that a user wants to make is certainly linked to the ringtone, which allows him to recognize incoming calls from those of other people. To do this you have to use the Settings application, accessible from the application drawer or from the notification curtain, by touching the gear in the upper right corner.
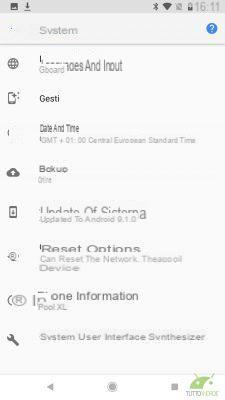
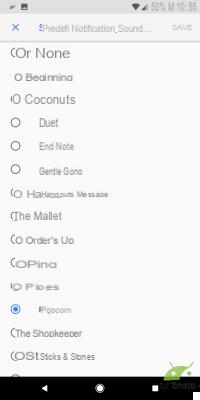
At this point you must touch the Audio item to access the next screen, where you can choose the phone ringtone. Touching the relevant item opens a curtain from which to select your favorite ringtone, with an immediate preview to see if it is to your liking.
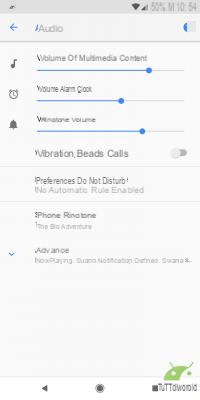
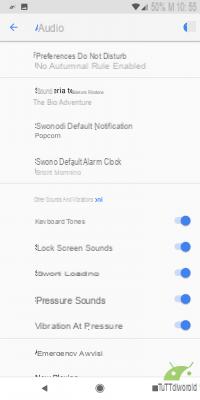
If you do not find something suitable, you can turn to third-party applications by downloading them from the Play Store, or by manually copying an MP3 file to be placed in the Ringtones folder of the smartphone and which can be selected only after restarting it. The same operation can be performed for the ringtone dedicated to system notifications and alarms, choosing from other system sounds. You can also decide whether to activate the vibration when receiving a call and activate the do not disturb function, as well as being able to adjust the various system volumes and various sounds.
2.1.4 How to customize the notification center of an Android smartphone
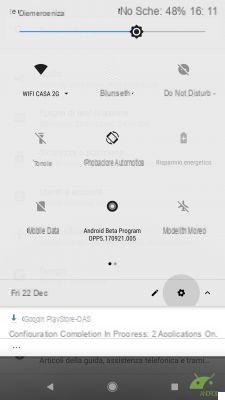
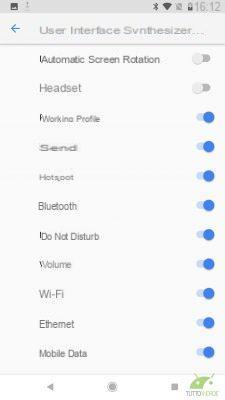
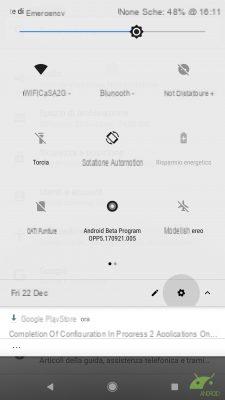 With the most recent versions of Android it is possible to decide which icons to display in the notification curtain, accessible by swiping down the status bar (the one with the icons and the system time). Just tap the pencil icon to enter edit mode. In this way you can decide which toogle (the small icons that allow you to access the various settings) to display and the order in which they are shown. In case you got confused and can't figure it out anymore, you can reset the default values through the three dots at the top right and the Reset item.
Each toggle allows you to access a different setting, in some cases by directly activating the function in others by opening the relative screen to obtain more information or change the parameters.
2.1.5 How to change the unlocking method
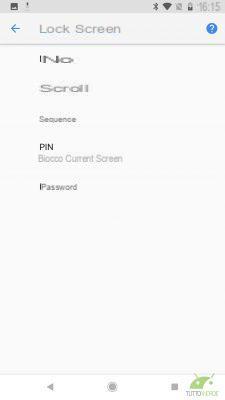
After the initial setup wizard, you can change the method you use to unlock your smartphone at any time. In devices Google Pixel there is currently only the fingerprint reader, but some smartphones with Android Stock may be able to select others, accessible from the Settings under Security. In this regard, we invite you to read our guide to the best unlocking methods, to find the one that best suits your needs.


Previous
Next
Fullscreen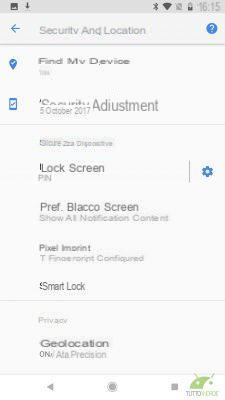


By selecting the gear icon next to the word Lock screen you can decide after how long to activate the lock and any message to show on the lock screen. By touching the writing you can instead change the method chosen at the time of the initial configuration: in addition to the three already described you can choose the classic scrolling or none. In this case, obviously you will not have any security and any configured fingerprints will be deleted.
If in the initial phase of the configuration you have added only one fingerprint, it is time to add others, in order to unlock the smartphone with other fingers, or to allow other people to log in. You can register up to five different fingerprints, associating a name to each being to make them more easily identifiable.
On the security page just select the item Fingerprint, type the PIN or password selected previously and proceed to register a new fingerprint, following the same procedure performed in the initial configuration.
You can also decide to unlock your smartphone with a wearable device, which keeps the smartphone unlocked nearby, in a certain location, when you have it in your pocket, with your voice and with your face, even if in this case there are no particular algorithms. complex to ensure high safety.
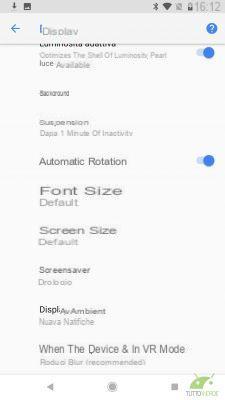
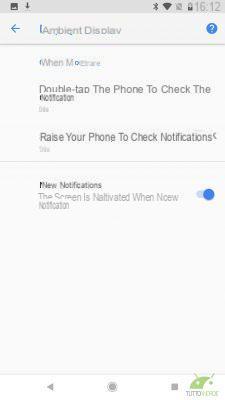
2.1.6 How to adjust the brightness and characters
Through the Settings application you can activate the Ambient Display, to turn on the screen when receiving new notifications, adjust the screen size, activate automatic rotation and adaptive brightness, which optimizes the brightness based on the available ambient light.

Previous
Next
Fullscreen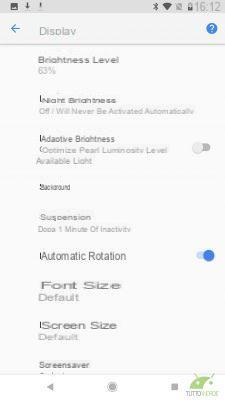


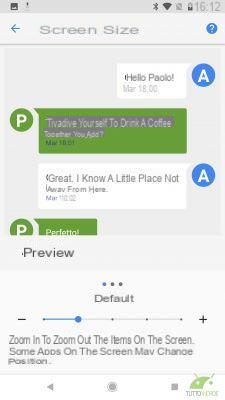
You can also adjust the screen and font size using, adapting it to your personal needs and tastes. You can manually adjust the brightness thanks to the slider at the top of the notification curtain, thus overriding the settings automatically proposed by the system.
3. How to install Android applications
When you turn on the new Android smartphone for the first time, you will find only the Google applications and those essential for the system. Obviously, however, all those applications that are usually used by users are missing, such as instant messaging applications, those dedicated to shopping and many others, accessible via the Google Play Store.
This is the virtual store from which you can download, most of the time for free, the applications that make your smartphone even more useful. To log in, you must log in with your Google account, an operation you performed at the time of first configuration of the Android smartphone. If you have not done so, you will be asked for your Google account data to access the store.
Without going into the details of the operation of Google Play Store, for which we refer you to our dedicated page, let's see how to simply install an application. The simplest method is to enter its name in the search bar, located at the top of the screen. After typing the name just press the magnifying glass icon on the keyboard and the Play Store shows you the corresponding applications, with the most relevant one in relief. At this point, simply press Install and wait for the application to be downloaded and installed on the smartphone.
Google Play Store automatically adds icons of newly installed apps to the home screen, unless you disable the option in the Store settings. To do this, just swipe to the right from the left edge of the screen, select the Settings item and remove the check mark from the item "Add icons to the Home screen". However, you can add a link later. by dragging the icon from the application drawer.
For the configuration of each individual application you just need to follow the guided configuration that each manufacturer insert in order to make the procedure simple and within everyone's reach.
4. How to uninstall or disable Android applications
It may happen that you no longer need a particular application that you have installed or that you want to remove a system application. Also in this case you can consult ours complete guide to uninstall or disable applications, without root permissions, but for convenience we give you a brief summary here.
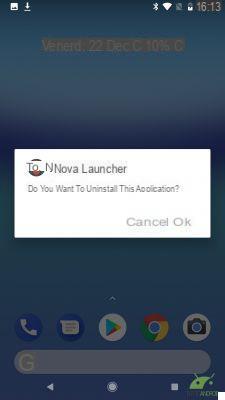
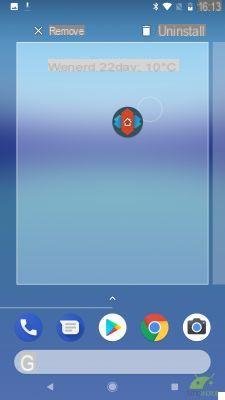
To remove an application from your smartphone you have two methods, both of which are very simple to use. The first method is to drag the icon of the application to be uninstalled to the trash, which appears by holding down the icon for a long time. The operation must be carried out from the application drawer, while carrying it out from the home screen you can choose whether to delete only the link or completely uninstall the application.


Previous
Next
Fullscreen


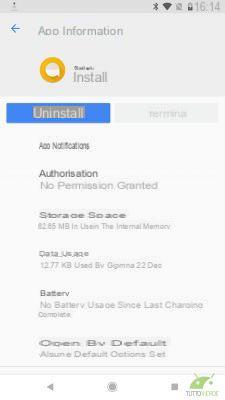
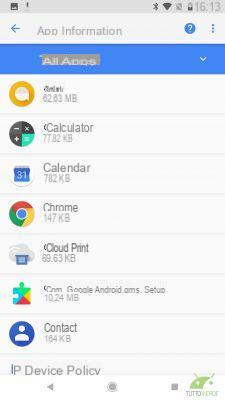
The second method allows you to find out which applications are occupying the most internal memory and decide whether to remove them or not. After starting the Settings app you have to look for the Apps or Apps and Notifications section. The list of applications installed on the system is shown with their space occupied. By selecting an application you will discover its information, with the ability to change permissions, notification settings and buttons to uninstall or terminate the application.
The second button is convenient to make sure that an application is actually closed and does not consume precious resources, while the first allows us to delete the application from the smartphone. A confirmation window is shown, to avoid deleting applications by mistake and giving a further confirmation the application is removed.
However, there are some applications that cannot be uninstalled from the smartphone. These are the system applications, entered by the manufacturer in the initial configuration and which can only be deleted by unlocking the root permissions, an operation that is not without risk. However, it is possible to disable applications that do not interest us, hiding them in the application drawer and preventing them from consuming system resources. The space occupied in the internal memory remains, but at least data, RAM and other system resources are not consumed unnecessarily.
In conclusion
We have thus come to the end of our guide that has explained to you how to set up android smartphone. In some cases the screens we have shown you may be different from those displayed on yours, depending on the different version of the operating system used, but in principle there are no major differences. On smartphones other than Pixels, which deliver the experience Google more complete, some steps may be missing and others may be presented in a different order, but by following the instructions presented in the various paragraphs you can be sure that your new Android smartphone is configured correctly.


