


Are you a photography enthusiast, do you want to publish your shots on the Internet but are you afraid that someone could steal them from you and violate your copyright? Don't worry, if you have installed Photoshop on your computer (or even on your smartphone or tablet), you can insert a signature on your digital photos and protect them against any kind of unauthorized use.
The signatures that can be inserted with Photoshop are of two types: a classic, textual or graphic type with your name, and a digital one which, despite being invisible, shows all the copyright information of the image even if it is copied. re-saved, resized or converted. The only flaw is that the second method is paid.
If everything is clear, I would say to ban the chatter and to see, together, how to sign photos with Photoshop. Make yourself comfortable, take all the time you need to concentrate on reading the next paragraphs and, more importantly, try to implement the "tips" that I will give you. There is nothing left for me to do, except wish you good reading and wish you a big good luck for everything!
How to sign photos with Photoshop on PC
Let's see first how to sign photos with Photoshop on PC e Mac, then using Photoshop CC. In the next paragraphs we will see how to insert both a text signature and a digital signature, even on multiple photos in series. Have fun!
How to sign your photos with Photoshop

If you wish to find out how to sign your photos with Photoshop in an "artisanal" way, that is by inserting your name, a logo or your handwritten signature inside the images, all you have to do is use the tools you usually use to insert photos and texts inside the images-
So, in the case of a simple copyright notice to be inserted in the center or in one of the corners of the photo, all you have to do is select it Horizontal Text tool from the Photoshop toolbar (just right click on the T and select it from the menu that opens), click on the point of the image where you want to insert the writing and type your signature.
With the toolbar at the top you can adjust character, formatting e alignment some text. Using the opacity bar in the layer box, after selecting the layer relative to the text, at the bottom right, you can make the writing semi-transparent.

To insert a handwritten signature inside the photo, you must first of all [scan it with a scanner] (https://www.fotoklan.com/come-scannerizzare-923718.html) or, if you have a [tablet graphics] (https://www.fotoklan.com/tavoletta-grafica-63319.html) to write directly on the PC, create an image that contains it.
After that, you need to open the image with the signature in Photoshop (menu File> Open), press the key combination Ctrl + A (your Windows) or cmd + a (on macOS), to select it, copy it (by pressing the keys Ctrl + C on Windows or cmd + c on macOS), paste it in the photo to be signed (by pressing the keys Ctrl + V on Windows or cmd + v on macOS) and adapt it to the context in which to insert it.
For example, if you want to insert a signature in black on a light background, you need to select the signature level from the box at the bottom right and set Multiply from the drop-down menu above. If, on the other hand, you want to create a white signature on a dark background (starting anyway from a black signature written on a white sheet), you must first invert the colors of the image with the signature (Image> Adjustments> Invert) and then set its level to Drain. Semplice, see?
Of course, you can also enter a graphic logo, as well as a digitized handwritten signature.
How to sign multiple photos at once with Photoshop
You need to sign multiple photos simultaneously with Photoshop? It is possible to do this too. If you have not already done so, I recommend that you create an ad hoc logo or signature, as it is a fundamental preliminary operation to proceed in the best possible way.
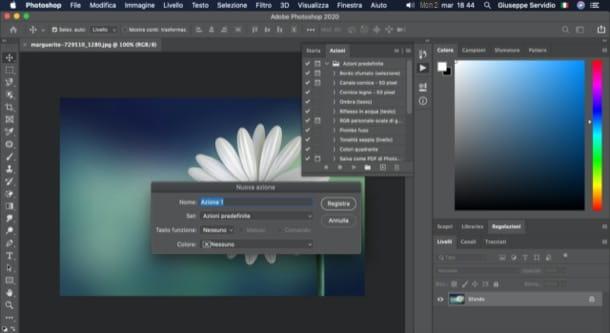
Next, open Photoshop and insert a single image inside the program (you can do this via the menu File> Open or simply by dragging it into its window), click on the button Story (l'icona dei three squares and one arrow at the top right), select the tab Actions and click on the button Create new action (l'icona del square with the +). Then enter the name of the action in the text field Your name (Eg Insert signature) and click on your button Register, in order to start recording commands.
To add the signature you created earlier, open the menu File> Insert embedded and indicate the signature or logo you intend to use as a watermark. When doing this, remember to select the entire photo using the key combination Ctrl + A (on Windows) e cmd + a (on macOS), set the position of the signature or logo with which you intend to "brand" your photos, by clicking on one of the buttons visible at the top (Align top edges, Align Bottom Edges, Align horizontal centers, Align right edges, etc.), which are represented by the symbol of a line and two rectangles.
After selecting the position of the logo, click on the button Stop playing / recording (the symbol of square), so as to finish recording the action started a little while ago and save the image you used as a "sample", to create the action relating to the automatic insertion of the watermark. Next, click on the entry Fillet e seleciona le voci Script > Image processor da quest'ultimo.

In the new window that has now opened, click on the button Select folder and indicates the folder containing the shots to be signed in sequence. In the section Select the location to save the processed images, check the box Save in the same location, to save the images in the same folder previously indicated or, if you prefer, click on the button Select folder to select another location. In conclusion, in the section Pref Renze, check the wording Take action, choose the action previously created, click on the button Run And that's it.
How to insert the Digimarc signature in Photoshop

To digitally sign photos with Photoshop, the mechanism is much simpler but you have to buy an ID (starting from 49 dollars / year) at the official website of Digimarc, the company that has created a sophisticated mechanism for protecting images by means of a watermark which, despite being practically invisible to the naked eye, uses dots in the image to insert all the copyright data into it. This data remains intact even when the image is copied, re-saved, resized or converted.
To sign your photos with Digimarc, you must first add the plugin to the copy of Photoshop installed on your computer. To do this, go to this page and download it to your PC by clicking on the appropriate button download for free and following the instructions that appear on the screen.
Once downloaded, the plugin should automatically install in Photoshop; if not, you will have to drag and drop the contents of the folder you got into the path C:ProgrammiAdobeAdobe Photoshop CC [ANNO]Plug-in (your Windows) or Applications Adobe Photoshop CC [YEAR] Plug-in (your macOS).
Subsequently, to start using Digimarc's digital signature function, you need to upload the image of your interest in Photoshop (via the menu File> Open) and then go up Filter> Digimarc> Include Watermark. In the screen that opens, click Customize and enter theUnique ID and PIN of your account on the next screen, in order to enter the data of your Digimarc account. For more information about the use of the plugin, I refer you to the official Photoshop guide.
How to sign photos with Photoshop online

uses Photoshop online and would you like to know how to sign your photos with the latter? Well, given the limitations of the Adobe online service, which for the record is called Photoshop Express Editor, you cannot expect to have the advanced tools I told you about in the previous lines. However, even in this case a little something can be done.
Before explaining in detail what, however, I remind you that the service requires the activation of the Adobe Flash Player plugin and allows you to edit only photos in JPEG format. Having said that, I would say we can proceed!
First, go to the main page of Photoshop Express Editor, click on the buttons UPLOAD PHOTO e Upload and select the shot of your interest. Next, click on the tab Decorate, click here Text and enter your signature, writing it in the appropriate text field.
Then reposition and resize the text (using the appropriate squares at the edges of the text field itself) and customize the font, colore,opacity and l 'alignment via the menus and buttons at the top. Finally, save the output image by clicking on the buttons Done e Save.
How to sign photos with Photoshop on smartphones and tablets

You would like to find out if it is possible sign photos with Photoshop on smartphones and tablets? Yes, of course! To do this, you can use one of the many Photoshop apps among those developed by Adobe, such as the excellent one Photoshop Express, available free for Android and iOS / iPadOS.
After installing and starting Photoshop Express, browse the information sheets that show you its main features and then log in with your Adobe ID, your account Google or your account Facebook, using the appropriate buttons.
Now, grant the app all the necessary permissions to make it work at its best and select the photo to be signed by pressing thepreview of a photo saved locally (in the main screen of the app). Otherwise, open the menu All the pictures located at the top left and select one of the other options available for importing the shot (eg. Camera, Creative Cloud, Etc.).
Once the photo to be edited has been imported, scroll down the menu at the bottom, tap on the letter T and select it style that suits you best. Then tap on the text that appears on the screen and, in the opened box, enter your signature and then press on the item end. Then drag the text to the desired point and eventually resize it, using the button depicting the two arrows.
If you like, change the font, colore and l 'alignment of the text, using the appropriate buttons. When you are ready to do so, save the edited image by pressing on freccia rivolta verse destra located in the upper right corner of the screen and choose one of the available saving or sharing options.
If you have one iPad, you may find it more practical to take advantage of the iPadOS version of Photoshop, which includes many of the features of Photoshop CC and also includes features designed specifically for touch screen technology and official accessories for some iPads, such as the Apple Pencil. The version of Photoshop for iPad is free for the first month of use, then it costs 10,99 euro / month.
How to sign photos with Photoshop


