


When you see a photo with a blurred background, you are always amazed by the beauty that this gives to the shot. Even some apparently insignificant details, such as the headlights of some cars in the distance, can help give the photo a “magical” touch. How about, then, if I teach you how to take photos with blurred background? Do you want? Great!
In the next paragraphs. I will explain to you in detail how to get photos with the background blurred, therefore with the so-called effect bokeh, using both some ad hoc functions included in many latest generation smartphones, and some third-party apps. And if you have a reflex camera at your disposal, I'll explain how to proceed with it too (with predictably better results than you can get with a phone).
So, can we know that you are still standing there? Come on: make yourself comfortable, take all the time you need to concentrate on reading the next paragraphs and, more importantly, implement the "tips" that I will give you. There is nothing left for me to do, except wish you good reading and, above all, have fun!
How to take photos with a blurred background on a smartphone
If you wish take photos with blurred background using your smartphone Android or your trust iPhone, then know that you can do it both by exploiting some specific functions that allow you to obtain an excellent bokeh thanks to the intervention of the software, and by using third-party apps.
Camera app bokeh function
To achieve the bokeh effect, the smartphone camera must distinguish the foreground and background of a photo. By managing to do this, the background is blurred by the software, while anything found in the foreground is kept in focus. Many latest generation Android and iPhone smartphones have an ad hoc function that allows you to take photos with a blurred background in an excellent way. Let me tell you more about it.
As for the devices Android, this function is present on practically all the top of the range of the main manufacturers (Huawei, Samsung, Google, Honor, Xiaomi, etc.), although the activation of this mode varies slightly from device to device. In principle, however, what you need to do to activate it is to open the app Camera, cycle through the various shooting modes and select that Portrait (it could also be called by different names, such as HD Portrait, Close focus, Etc.).
If you own a iPhone capable of taking pictures with a blurred background (7 iPhone Plus, 8 iPhone Plus, iPhone X, iPhone Xr, iPhone Xs e iPhone Xs Max), instead, you have to open the app Camera, slide your finger to the right or left (depending on the shooting mode currently set) and select the one named PORTRAIT. As you can see, by activating this mode and taking a photo of a subject, the background will be automatically blurred, while everything in the foreground will be in sharp focus. If you own an iPhone Xs or Xs Max, you can even change the intensity of the bokeh effect in post-production thanks to some features included in iOS 12 (exclusive to these iPhone models). Not bad, right?
Do you have an Android smartphone or an iPhone that is not equipped with ad hoc functions to blur the background? In this case, while shooting, you can try to make a photo with a blurred background paying attention to some tricks. Clearly, you will hardly get results similar to those obtainable from smartphones that have more advanced hardware and software features.
The most important trick of all is that of get as close to the subject as possible you want to focus on and make sure the latter is as far away from the background as possible. If your smartphone camera struggles to focus on the foreground subject, try a tap on the screen at the subject you want to focus on. If you still can't focus on the subject and blur the background, try moving away a little, doing so will “help” the camera to focus on what is in the foreground.
App to blur the background
If your device doesn't have an automatic background blurring feature, you can always try blurring the background in post-production. There are so many apps that allow you to blur the background of their shots obtaining more or less interesting results. Let's take a closer look at a couple of them.
AfterFocus (Android/iOS)
AfterFocus is an app that allows you to carefully manage the depth of field, giving you the possibility to choose with great precision which area of the photo to blur and which, instead, to keep in focus. It is free for Android, while it is paid on the iPhone (where it costs € 1,09).
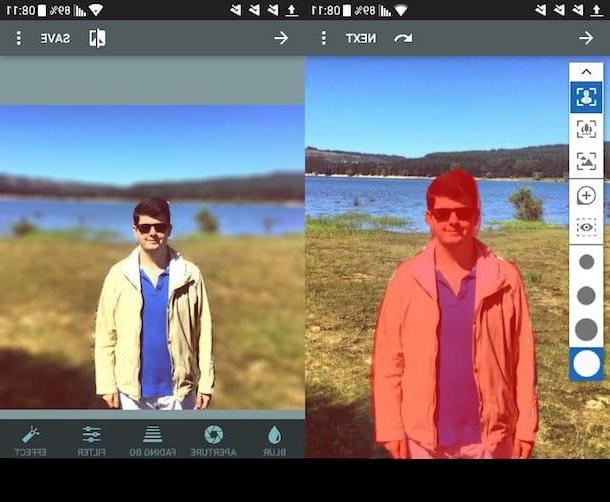
After installing and starting AfterFocus on your device, tap the button Album if you want to blur the background of an already taken photo, or press the button Camera to take a photo on the spot and edit it right after. Once you have the photo you want to retouch in front of you, you will be asked if you prefer to use the automatic blur tool or the manual one: I personally found that the automatic tool does not always work at 100% (especially with more "complex" shots ), so I suggest you try the manual one.
After selecting the option Manual and having pressed the button Continue, highlights in red the portion of the photo that you keep in focus trying to be as precise as possible. Therefore, press on the button Next and, almost as if by "magic", the background of the image will be blurred, creating a sort of "artificial" bokeh. Finally, press the button Save and then Yes to save the changes made.
Instagram (Android / iOS)
If you are subscribed to Instagram and you have downloaded the app of the famous photographic social network on your Android or iOS device, you can take advantage of its feature to take pictures with an excellent background blur effect, which is applied to the shots that have a face as the protagonist. Let me explain in more detail how to best use it.
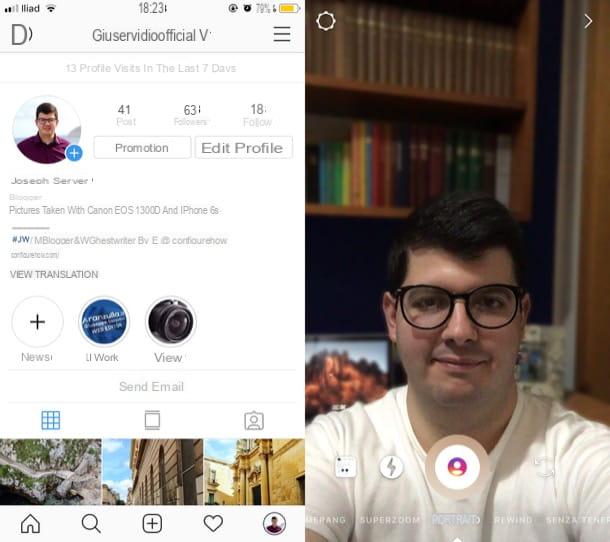
To begin with, start the Instagram app, log into your account, press the icon of thelittle man at the bottom right and tap on the symbol capacitor positive (+) lead located at the top left (on your profile photo). Then scroll right or left the available shooting effects (depending on which one is currently set) and select the one called PORTRAIT.
At this point, frame your face (or that of the subject you want to take the photo of) with the smartphone camera and, as you can see, the background will be blurred even before taking the photo, giving you a preview of the final result. You just have to press oncentral ring, on which a stylized face, to take the photo and then decide to download it locally by tapping on the icon freccia rivolta verse il basso (top right), to publish it in yours history (using the appropriate button at the bottom left) or, again, to send the photo to another user by pressing the button Send to (located at the bottom right). Easier than that ?!
How to take photos with a blurred background from Reflex
If you have one reflex, taking shots with the background out of focus will be relatively easier. It must be said, however, that to obtain appreciable results, it would be better to use bright lenses, which have an aperture of f / 1.8 or, even better, of f / 1.4.
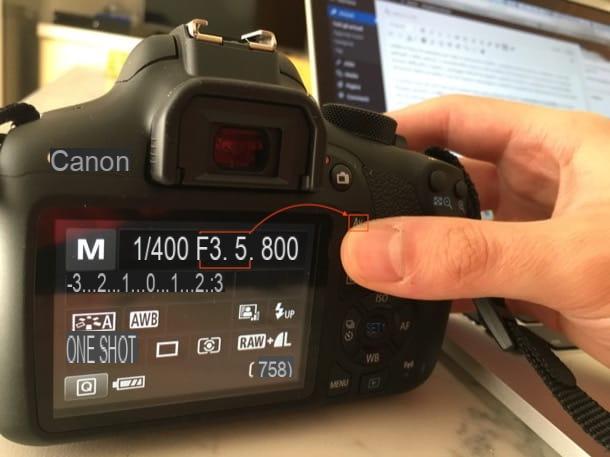
If, as in my case, you have a less bright lens (for this part of the tutorial I used a 18-55 mm of the Canon with f / 3.5 mm aperture mounted on a Canon EOS 1300D), you can still get satisfactory results by opening the aperture to its maximum aperture and getting as close as possible to the subject you want to stand out from the background.
To take the photo, turn on the camera by flipping to ON the switch located on the machine body and rotates the selection dial setting the manual shooting mode (marked with the letter M). Then press the button Av / + - present on the camera body (if you have a non-Canon camera, read its user manual to know the corresponding keys), place your index finger on the main bezel (the toothed one, so to speak) and move it to the left, so as to set the maximum aperture.
Now, get as close as possible to the main subject, trying to make it as far as possible from the background (especially if, as in my case, you have a low-light lens). Then look inside the viewfinder, compose the image, press the halfway shutter button to focus on the foreground subject and keep pressing the shutter button to take the photo.
If you have not obtained a good result, perhaps you would do well to review the information I gave you in the study in which I explain in greater detail how to blur the background with the Reflex. I am sure that this reading will also be to your liking.
How to take photos with a blurred background


