Often you have so many apps or services running that we are constantly disturbed by jingles and various music, and if you are here then you really have enough! In fact, in this guide, we will teach you how turn off notifications on iPhone and iPad in a few simple steps, and later we will also see how modify them according to your preferences.
The system of the bitten apple in fact provides the complete management of notifications in all its aspects or, alternatively, the complete deactivation of any notification by an app. For some applications then, as we will see shortly, there is one dedicated notification management and more thorough. So let's not waste any more time and let's start:
How to turn off notifications on iPhone and iPad
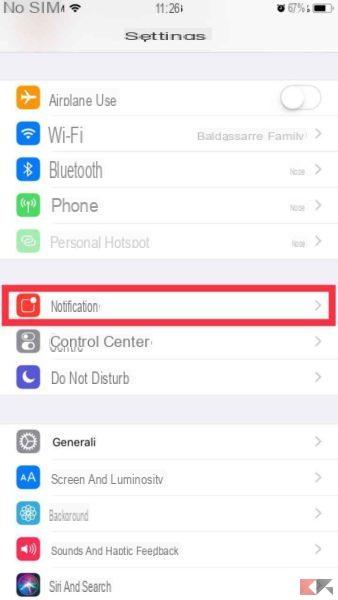
As mentioned, iOS is particularly concerned with managing notifications, so much so that it dedicates an entire section to it. On your iPhone or iPad, in fact, by going to the app Settings, you will immediately notice the section "Notifications", As in the photo below:
 How to turn off notifications on iPhone and iPad 1">
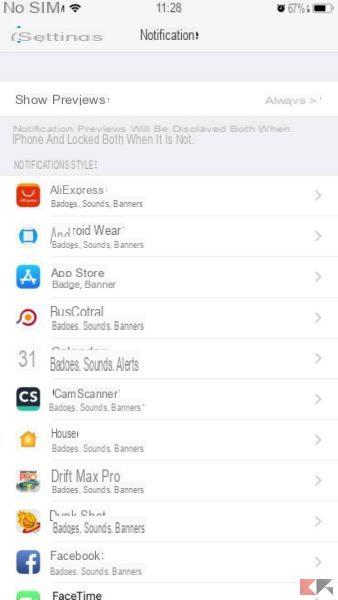
At this moment you will have a page that contains all the apps installed on your device. Before we see how you can turn off notifications on iPhone and iPad though, note carefully what is written under the name of each application. As in the image below, you will notice that under each app there can be a maximum of three items - Badges, Sounds and Banners - which summarize the "permissions" in managing notifications.
 How to turn off notifications on iPhone and iPad 2">
In fact, each application can have certain permissions in accessing the notifications of your iPhone or iPad. These permissions are managed by the system with three different categories:
- BADGE: the app can display badges (or "dots") on the icon that has received a notification, with the number of notifications received inside;
- SOUNDS: the app can use the ringtone you have set for notifications to notify you of the arrival of one of them;
- BANNER: the app can display a banner (momentary or permanent) at the top of the device screen.
Later we will see how to manage these aspects. However, if you just want to turn off notifications on iPhone and iPad, then you just have to select the app you no longer want to be notified of. Once this is done you will find a screen similar to the image below: all you have to do is click on the green tick "Consenti notified”And from now on that app will no longer have access to any of the notifications described above.
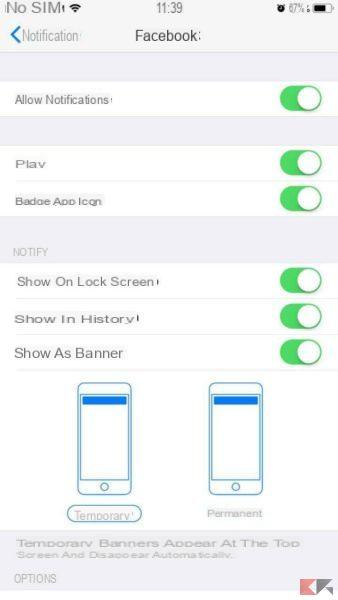 How to turn off notifications on iPhone and iPad 3">
Once deactivated, in fact, you will see a screen similar to the one in the photo below on the left and, going back to the notifications section, you will notice that below the app there will be no more permission (banners, badges or sounds), and instead of those you will find the words "No", Just like in the picture:
In this way you can disable notifications on iPhone and iPad with any version of the operating system in a fast and extremely simple way, but as mentioned iOS allows a more advanced management of notifications, and therefore we will now see how to use it in the best way to be able to customize the behavior of notifications. of your devices.
Manage notifications on iPhone and iPad
If an app's notifications are particularly annoying or invasive, often the best solution is not really to completely eliminate any possibility of that app to access notifications, especially if it is a fairly important application. With iOS you will soon learn how to thoroughly manage the permissions of each app in the management of notifications and, instead of disabling them completely, you can simply limit them according to your preferences.
As we saw earlier, in fact, each application installed on your device can access notifications in three different ways which, generally, are called Badges, Sounds and Banners. Let's see them in more detail:
- BADGE: upon arrival of an alert from an app, generally combined with a notification sound, a small badge will appear on the app icon, or a "dot" indicating the number of not yet displayed notifications of that application. The only way to remove them is to enter the app and view them, but sometimes it can be very tedious (for example when you have hundreds of emails);
- SOUNDS: if an application has permission to access the Sounds of your iPhone or iPad, the ringtone you have chosen for notifications will be played when an alert is received. If you do not want to be disturbed, just disable this permission, or silence the device with the appropriate selector which is - usually - at the top left, but in this case you will silence all notifications;
- BANNER: all apps that have access to notification banners are able to display a banner containing information about the application and the notification that has arrived on the screen (top). The banners can be shown above the apps, and therefore interfere with any operations that are taking place, especially if the banner is set to "persistent": in this case the banner will not go away until you swipe bottom up.
Now that we have in mind how notifications work on iPhone and iPad, we just have to find out how to act on them to be able to customize them to your liking. As before, go up Settings -> Notifications and select one of the apps that are bothering you. In the "worst case" that application will have access to all permissions for notifications and you will be faced with a screen similar to the following:
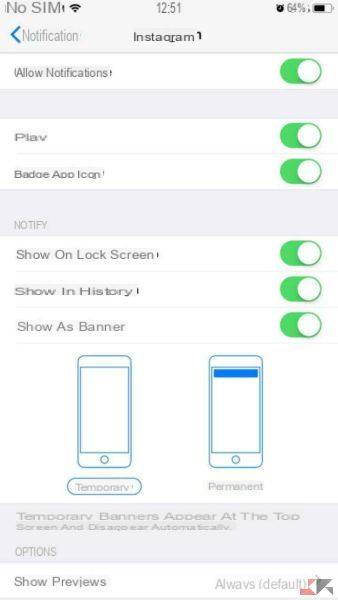 How to turn off notifications on iPhone and iPad 6">
In this case we have taken the Instagram app as an example, but it is irrelevant to the explanation. Now let's see step by step all the items present, what their purpose is and what their activation / deactivation entails.
- Allow Notifications: this option, as seen in the previous paragraph, allows you to completely disable notifications on iPhone and iPad. By clicking on this toggle all the other items will disappear and you will no longer receive any type of notification from this app;
- Sounds: by unchecking this selection, the app in question will still be able to warn you "visually" of the arrival of a notification with a badge or banner, but no acoustic warning will be issued;
- Badge app icon: with this option you can hide the badge of notifications received for that application. It becomes very convenient in the case of apps with many unread notifications that you don't want to show one by one;
- Show on lock screen: notifications received on iPhone and iPad remain on the device's lock screen so that they can be viewed later. By removing this check, notifications will be shown only when the screen is unlocked;
- Show in history: when you pull the recent notifications menu from top to bottom, if this check is deactivated, the notifications of the app in question will not be present in the notification history;
- Show as banner: this option allows you to manage the ability of an app to show a banner upon receipt of a notification. The banner can be completely deactivated. If active, however, you can choose whether to show it temporarily (for a short period of time) or permanently (you will have to swipe it off);
- Show previews: this option allows you to fully manage previews of notifications received. Usually the previews appear on the unlock screen and activate the device screen. Turning them off might be useful if you don't want other people to see the notifications you receive. More precisely, the “Show previews” option by default is preset to Always, but it can be changed to Never or to “When unlocked” (thus excluding the previews on the lock screen).
But that is not all! Some apps can contain multiple services, and iOS allows you to manage and customize the notifications of each service related to that application. A very simple example - but there are so many other similar apps - is the Mail application where you may have linked more than one account. In the figure below, for example, my Mail app manages four different mailboxes:
By checking a box you will be allowed to manage notifications for that box only (in the image on the right, for example, the Outlook account mailbox is being managed). This will give you even more complete control of all notifications on iPhone and iPad.
In case you are having problems or need clarification, do not hesitate to leave a comment below or ask our Messenger Bot (Facebook) who will put you in direct contact with our staff and can report you offers, coupons, discounts and promotions whenever you want! Meanwhile, here are some other links that might interest you:


