


Here, unfortunately it happened to you too: one click too many and you have deleted those photos that you absolutely wanted to keep! I guess you are now thinking about how to get them back, since you have no way of getting them otherwise and you didn't have time to send a copy to your friends. What if I told you that all is not lost, and that there is a possibility that you can use programs to recover accidentally deleted images?
Yes, this is absolutely possible, as in many cases the deletion of a file is apparent: in reality the operating system is “instructed” to mark the file space as free space, however the photo still remains there, at least until it is actually overwritten; among other things, thanks to the integrations of many operating systems with the cloud, you may have also stored photos on the Internet without knowing it!
Whatever your case may be, you have come to the right guide at the right time: in the following lines, I will list a list of programs for recovering deleted photos, which can help you regain possession of what you deleted by mistake. However, I must tell you right away that the result is not always guaranteed: it all depends on how much you used the device after deleting, and above all, on the type of device from which you have to recover the images. It doesn't hurt to try: take five minutes of time, sit comfortably and carefully read my tips and instructions to proceed, always remembering that all is not lost!
ZAR (Windows)
The first program I want to introduce to you is called Zero Assumption Recovery (ZAR), is designed for the operating system Windows, it is completely free and was created to recover both photos and files deleted by mistake and files present on partially damaged storage media. Before explaining how it works, I want to recommend you to do not save the recovered images on same device from which you recover them: you could do greater damage and make them permanently irrecoverable.
Having said that, the first thing you need to do is connect to the ZAR download page and click on the link zarXsetup.exe, to download the program installation file. When the download is complete, double-click on the file you just downloaded, then click the button five times Next and finally on the button install.
If prompted, click the button Download and install this feature and wait for Windows to finish downloading and installing the . Net Framework (a free component released by Microsoft itself, without which the software cannot work). Then put the check mark next to the item Launch ZAR and click on Finish, but will conclude the setup.
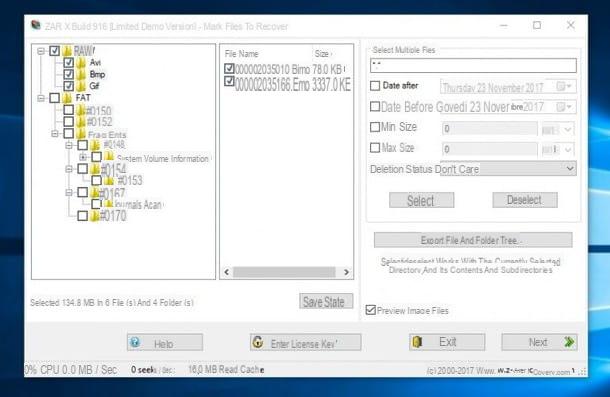
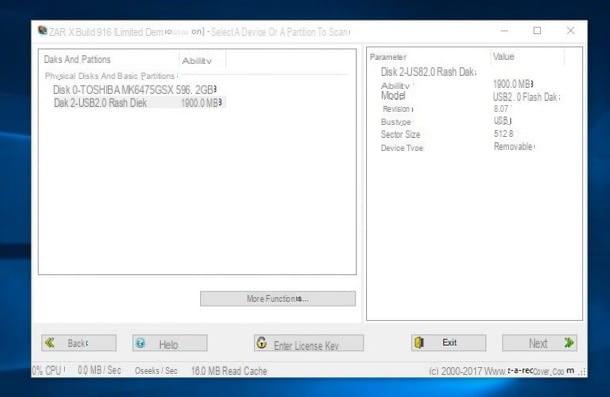
When installation is complete, start ZAR, click on the button Image Recovery (Free) and choose the drive from which to recover accidentally deleted photos. Then click on the button Next, wait for the scan to complete (it could take up to several tens of minutes) and put the check mark on the folder RAW, to select all images or next to each extension, to select them individually (you can see thumbnails of the images by checking the box Preview Image Files). If you want, thanks to the items in the program, you can recover only the photos taken in a given time interval (by checking the boxes Date After e Date Before and filling them with the dates in question), or photos larger or smaller than a given size (by ticking and filling in the boxes Min size e Max size).
Once you have set the program as you prefer, click on Next, then on the button with the three dots (...) to choose the destination folder in which to save the images (remember, as I explained earlier, to choose a folder that is not on the same drive). Finally, click on Start Copying, wait for the operation to complete and then click on Exit. If all goes well, the recovered images will be waiting for you in your chosen folder!
EaseUS Data Recovery Wizard (Windows / macOS)
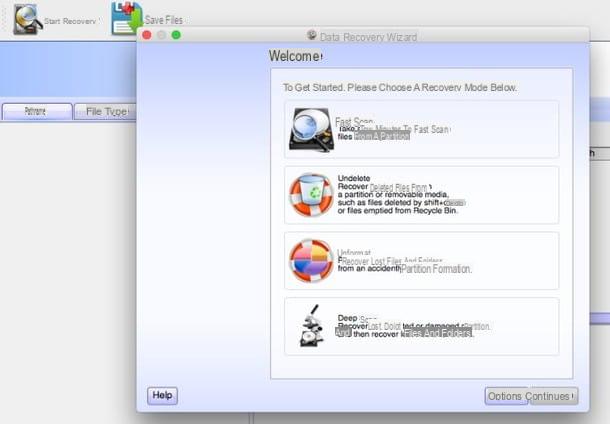
EaseUS Data Recovery Wizard is one of the best programs for recovering photos and any other type of deleted file. It is extremely simple to use, supports all major graphic file formats (JPG / JPEG, TIFF / TIF, PNG, BMP, GIF, PSD, CRW, CR2, NEF, ORF, SR2, MRW, DCR, WMF, RAW, SWF , SVG, RAF, DNG etc.) and all devices: internal and external hard drives and SSDs, SD cards, USB memories, cameras, smartphones, tablets, etc. It even works on formatted or damaged drives, RAW partitions, after system crashes and after malware infections.
The program of EaseUS is compatible with either Windows that with MacOS and is available in two versions: a basic, free one, which allows you to recover up to 500MB of data (or 2GB, if you share the software online) and a paid version, without limitations on the amount of data to be recovered, with prices at starting from 66,69 euros.
To download EaseUS Data Recovery Wizard Professional to Windows (which must be activated with the purchase of a license, otherwise it only shows the files to be recovered but does not allow them to be exported), connected to the official website of the program and click on the button Free trial. To download, instead, EaseUS Data Recovery Wizard Free (the free version of the software that allows you to recover up to 2GB of data), connected to this other page of the EaseUS site and click on the button Scarica free.
A download complete, apri il .exe file got and answer Yes all'avviso che compare sullo schermo. Dopodiché assicurati che la casella relative alle EaseUS license (in basso a sinistra) sia spuntata, premium pulsating Install now, wait for the download of all the files necessary for the software to work, then their installation and complete the setup by pressing the button Sign up now. If you don't want to send anonymous statistics related to the use of the software, click on the item Personalizza l'installazione (bottom right) and uncheck the box that appears at the bottom of the window.
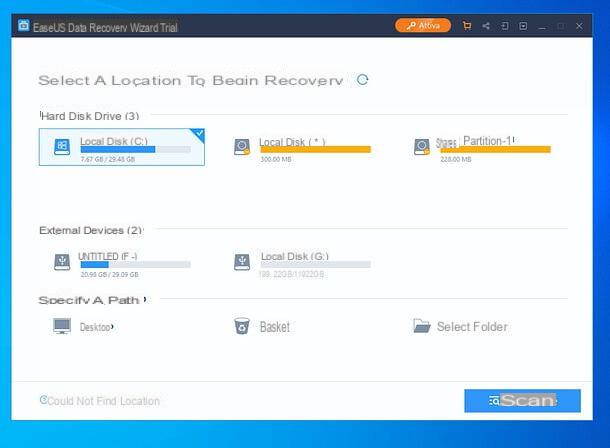
Once the software is run, click on therelative icon all'unità from which you intend to recover the photo cancel and click on your button Scan, at the bottom right, to start scanning.
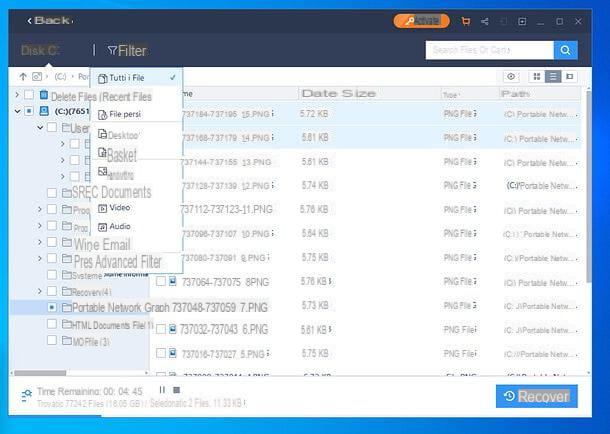
Then, to filter the search results and view only the images, click on the item Filter, at the top, and check the option Graphs in the menu that opens. Select, therefore, the files you want to restore (by checking the relevant boxes), press the button Recover (bottom right) and indicates the folder in which to export them.
If you want, you can also preview the images before recovering them: just select them and click on theicona dell'occhio located at the top right.
I use a Mac? No problem - you can download EaseUS Data Recovery Wizard using i link che ti ho fornito in precedenza e cliccando sulla voce relative alla Mac version of the software. Next, to install the program, open the package .dmg ottenuto e trascina l'icona di EaseUS Data Recovery Wizard in the folder Applications Mac. Easier than that?
TestDisk/PhotoRec (Windows/macOS/Linux)
PhotoRec is one of the best free programs for recovering photos or other types of deleted files; it is available for all major desktop platforms, however it works differently depending on the operating system used: su Windows, for example, PhotoRec has an excellent graphical interface; on MacOS e Linuxinstead, the application must be used via terminal or command line.
You can download PhotoRec from its official website by clicking on the link for your operating system (under the heading TestDisk & PhotoRec 7.0). TestDisk, a free software for data recovery and recovery of lost partitions, is automatically downloaded together with PhotoRec, but you don't need it at the moment. So let's not get lost in further talk and let's see immediately how PhotoRec works on the various operating systems.
Windows
As I mentioned earlier, PhotoRec is equipped with a practical graphic interface that facilitates (and a lot!) Its use on the Windows operating system: from there you can proceed with the photo recovery operation in a few clicks, without complicating your life. with keyboard and command line!
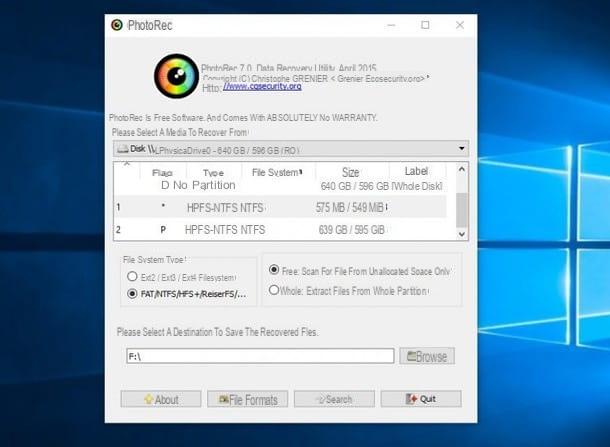
Once you have downloaded the archive containing the program, extract it to a folder of your choice, right click on the file qphotorec_win.exe, select the voice Run as administrator from the menu that opens and click on Yes, to launch the PhotoRec graphical interface.
Nella finestra che si apre, fai clic sul pulsado File Formats that you find at the bottom, put the check mark next to the boxes with the extensions of the images you want to recover (for example bmp, jpg, jpeg, png, gif, raw and so on) and click on OK. Now, press the button KATEGORIEN and choose the folder in which to save the recovered images - remembering, as I recommended earlier, to choose a different disc from the one you are recovering files from -, click onunit which contains the files to be recovered (top), put the check mark on the File System in the area File System type (if you don't know what to choose, leave the checkbox on FAT/NTFS/HFS+), and choose whether to search only on the free space of the drive (by putting the check mark on the box Free) or even on the space used (by putting the check mark on the box Whole). After setting the program according to your preferences, click on Search, to start the search.
Once the procedure is complete, click on the button Quit and, if everything went well, you will be able to find the recovered images in the previously chosen folder.
macOS / Linux
As I explained earlier, the procedure on macOS and Linux is quite different from that for Windows: in both cases you have to use the terminal to recover the deleted photos: carefully follow the instructions I am about to give you and, you will see, there will be problems.
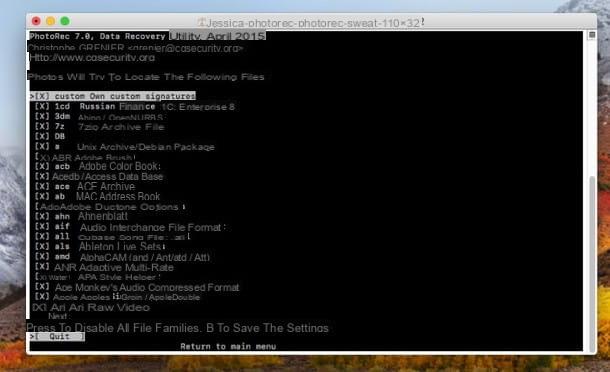
If you are on MacOS, extract the downloaded archive, open the program folder, then right click on the file photorec, select the item apri from the menu that opens and then click on the button apri; are these poisons are Linux, extract the archive, right click on the file photorec and select the item Run in Terminal.
At this point, the procedure to follow is the same on both operating systems: press the right arrow keypad until the item is highlighted Sudo, awarded his Submit and enter the administrative password of your account; using the directional arrows and the Enter key, choose unity from which you want to recover photos. Now, before you choose the partition, use the directional arrowsI will select the voice File Opt (below), then presses Submit. Press the button S, to deselect all extensions, check the boxes for image extensions (jpg, png, gif etc.), and add a check mark next to each of them using the space bar.
Once this is done, press Submit, select the partition from which to recover, move to the item Search and press again Submit. Choose now the file system of the drive to be recovered, press Submit, and finally decide whether to scan on free space (Free) or on the entire space available (Whole), considering that in the latter case the operation will be particularly long.
To start recovering deleted photos, select the destination folder in which to save the recovered files (paying close attention to what I told you before, that is not to save the files in the same drive from which you recover them): keep in mind that to go to the upper folder you have to press on the item ".." . Choosing the folder, press the button C keyboard to start the procedure; wait for the process to complete, press Submit, then move to the item Quit and presses on Enter again. If all goes as expected, the recovered photos will be saved in the chosen folder.
Renee Undeleter (Windows/macOS)
Renee Undeleter is another useful tool for recovering deleted photos on Windows and MacOS. Except for the installation procedure, the operation of this software is identical on both operating systems, and also this time the usual recommendation applies: the files to be recovered must not be saved on the same drive / partition from which they are recovered, otherwise the operation may fail.
To recover deleted photos with Renee Undeleter, download the version of the program dedicated to your operating system from the official page: the free version allows you to recover up to 20 MB di file, by operation, often more than enough if we are talking about photos deleted by mistake. If you're on Windows, go for it Double-click on the file you just downloaded and proceed with the installation as usual; if, on the other hand, you are up MacOS, click on the downloaded file, then on the button Agree, finally drag the file in the folder Applications of your Mac.
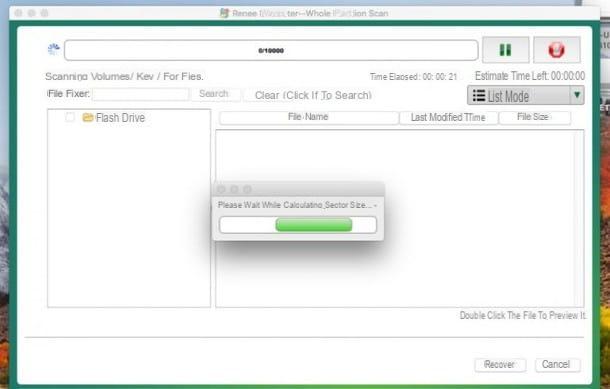
Now start the program by double clicking on its icon (if you are on Windows) or by right clicking on its icon and selecting the item apri from the menu that appears (if you are on macOS, this operation is only necessary at the first start). Then click on the button Whole Partition Scan, then select the partition from which to recover files and click the button Next; wait for the device to be analyzed, put the check mark next to each file to be recovered, click on Recover and choose the folder to save the recovered photos. Finally, click on OK, wait for the procedure to finish and close the program: you will find the recovered photos in the chosen folder.
Lazesoft Mac Data Recovery (macOS)
If the programs I have shown you so far have not satisfied you, you can take a look at Lazesoft Mac Data Recovery: it is an application designed for macOS which, thanks to its very simple and intuitive interface, allows the deleted photo recovery in just a few clicks and without special computer skills.
The first thing you need to do is connect to the download page of the program and press the button Free Download Now, then drag the downloaded file to the folder Applications of your Mac and start it by right clicking on them and selecting the item apri from the menu that appears (this operation is only necessary at the first start).
To start photo recovery, click on the button Deep Scan, then on the drive from which to recover the files, and again on the button Continue; now put the check mark in the box Partition Recovery using selected file typesclick on your button Continue and put the check mark in the box next to the item Graphics (if you want, you can also choose the individual extensions to recover by clicking on the small arrow next to it).
Now press the button Start Search, wait for the analysis to complete (it may take some time), then click the checkbox next to each photo you want to recover and, once finished, press the button Save Files. Select the folder in which to save the recovered files (always remembering to use a different disk than the drive from which you recovered them) and wait for the process to complete.
Photo (macOS / iOS)
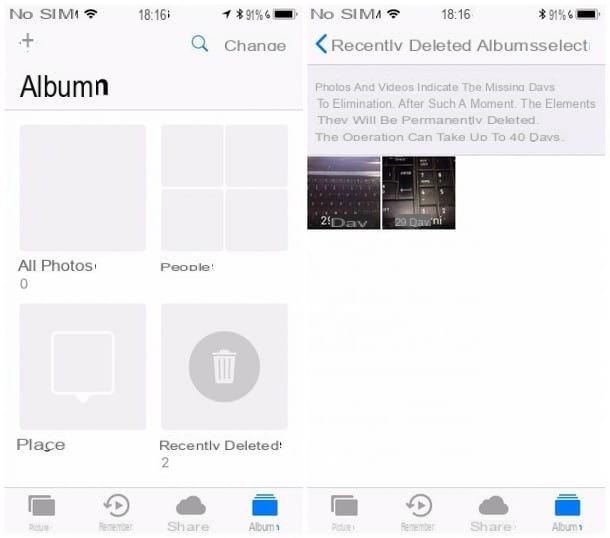
Wait, you're telling me that you just don't want to install programs because you are afraid of damaging your disk Mac, or that you accidentally deleted photos from yours iPhone or give you iPad? Then I have great news for you: if the photos have been deleted in the previous 30 days, you have the option to recover them both on the operating system MacOS both iOS (therefore on Mac, iPhone and iPad) using the album Recently Eliminated.
Don't you know what it is? I'll explain right away: this album, introduced a few years ago (I'm talking about the times of iOS 8), is a kind of _cycle_ that contains the deleted photos and keeps them for thirty days. You can easily recover such photos in the space of one click or one tap! To do it from iPhone o iPad, apri l'app Gallery of your device, then tap on the icon Album that you find at the bottom right.
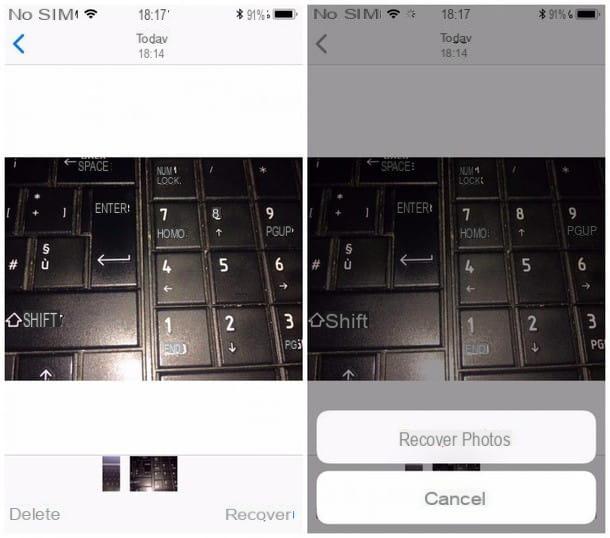
Scroll down until you find the album Recently deleted and tap on its icon: press on photo to be recovered, then presses on the voice Recover that you find at the bottom right, and again on the button Recover: in this way the image is restored not only in the photo gallery, but also on iCloud.
To access the album Recently deleted on the Mac you have to follow pretty much the same procedure: open the Finder, then click on the menu vai and on the voice Applications; presses the icon Gallery, then on the menu Fillet and, finally, on the voice Show Recently Deleted. At this point select one or more photos to recover and, to do so, simply click on the button Recover that you find at the top.
How do you say? Didn't find what you were looking for in the trash can of your iPhone's Photos app? Don't worry, I told you in detail about other efficient methods to recover deleted photos from iPhone in my specific guide on the subject.
Google Photo (Android / iOS)

You have a smartphone Android and do you already know that to attempt recovery you need quite complex procedures? Before throwing yourself headlong into root and third party apps, my advice is to try to recover deleted photos with Google Photos. I'm sure you've turned on the automatic backup of your photos to the Google cloud - if so, you're in luck, because Google Photos comes with a basket which allows you to recover deleted photos in the previous sixty days! Furthermore, this procedure is valid even if you have enabled the backup via Google Photos on yours iPhone o iPad.
To access the Google Photos trash bin, both on Android and iOS, press the app icon to open it and then on the icon Menu ☰ that you find at the top left; tap on the item Trash can, press and hold your finger on a photo for select it, and possibly also select the other photos to be recovered; at this point, to restore the images, presses on circular arrow ↺ that you find at the top right.
DiskDigger/DiskDigger Pro (Android, root)
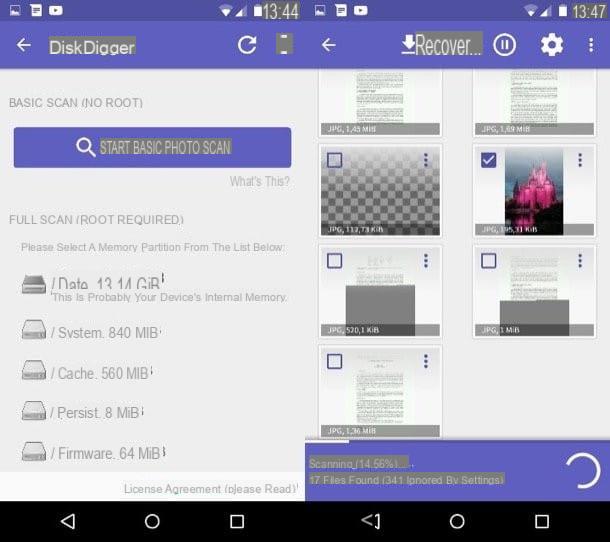
Do you have an Android device but the images you are looking for are not present on Google Photos? Well, at this point it is necessary to rely on a third-party app that can do this type of work: to be precise, you can rely on DiskDigger, an extremely intuitive app that allows you to recover deleted photos from Android in just a few taps.
Before explaining how to do it, I have to give you two quick information: the first is that DiskDigger is a free photo recovery app JPG e PNG, while it must be purchased in the Pro version (at the price of 3,37 €) to recover other types of photos as well; the second, however, is that if the app is used on a non-rooted device, this is "limited" to making one search and an attempted recovery in the local cache and in previews; instead, to perform a complete scan of the device memory, you need to tune to the app i root permissions - which you can get on your Android device by following my tutorial.
Once the app is installed from the Play Store, presses on its icon to open it and, when requested, presses on Yes, to grant them i root permissions, or press on START BASIC PHOTO SCAN, to perform the analysis without root. Choose theunit on which to carry out the analysis by pressing on his icon, then touch the box next to the extensions to be recovered (JPG or PNG if you use the free version, or even others for the Pro version). Now touch the item OK, wait for the analysis to complete (it may take several minutes) and put the checkmark on the box next to each photo to be recovered, finally, presses the button Recover ⤓ up.
You now have three choices: the first is to save the recovered photos through an app already present on your smartphone, to be chosen from Dropbox, Google Drive, sharing via Email, WhatsApp or other (in short, using the system sharing menu); the second is to save the files to the device memory in a custom folder, and the third choice, finally, is to upload the recovered images to a FTP server. Tap on the item that best suits your needs and follow the on-screen instructions to complete the save.
How do you say? You don't want to activate root permissions on your Android or what I have told you so far is not satisfying you? I suggest you take a look at my specific guide on how to recover deleted photos on Android for a specific study on the subject.
Now that you have read all my tips and advice you should finally be able to recover photos deleted by mistake from your devices, with the knowledge that, next time, you need to pay more attention before pressing the "Delete" button on your device. operating system! I want to give you one last piece of advice: if none of the previous methods can satisfy you, or if worse still you have to recover not photos deleted by mistake but photos from a disk or from a memory that is about to break (or is already broken), give a look at my specific guide on how to recover data from a damaged hard drive.
Articolo realizzato in collaboration with EaseUS.
Programs for recovering deleted photos


