The PEC (Certified Electronic Mail) has revolutionized the relationships between public administration and citizens and also between companies. Today it is unthinkable not to send the necessary by certified mail.
Certified mail, in fact, conveniently allows the sentheng of e-mail messages that have legal value like one registered mail with return receipt or a fax. Above all companies and professionals, they have a PEC but to consult it they have to access its portal, usually through web mail.
Not many know that it is possible easily configure your PEC on Gmail, in order to have everything at hand and to receive and send certified mail from Gmail.
In this article: Gmail Pec Prerequisites | PEC parameters | PEC Configuration from Computer | PEC configuration from Android | PEC configuration from iOS
Prerequisites: have a PEC email address and a Google account
If you already have your own PEC email address and a Google Gmail address, you can skip this paragraph and move on to the next ones.
If you need a PEC, you may want to start with a free solution, we have dethecated an article to activate a mailbox with a PEC address: The best free PEC.
Also, if you don't have a Google mail account, you need one: getting it is very simple, just open this page and register by following the instructions.
The configuration parameters of your PEC
If you have a PEC mailbox, to configure it properly on a Gmail account, you need some parameters and thescovering them is simple.
Below we have made a quick list of the updated parameters for the most used PEC services. If the supplier of your PEC is not among them, do not worry, it will surely have a page dethecated to the parameters. Often to find this page just do a Google search for the mail server settings, by typing as a keyword “the name of your certified email service + configuration“.
List of the most used services to have a PEC mailbox:
Register.it
- POP3: pop.securemail.pro
- SMTP: authsmtp.securemail.pro
- Door in: 993
- Door out: 465
Aruba
- POP3: pop3s.pec.aruba.it
- SMTP: smtps.pec.aruba.it
- Door in: 995
- Door out: 465
Postcert
- IMAP: mail.postecert.it
- SMTP: mail.postecert.it
- Door in: 993
- Door out: 465
Legalmail
- POP3: mbox.cert.legalmail.it
- SMTP: sendm.cert.legalmail.it
- Door in: 995
- Door out: 25 or 465
KOLST
- POP3: pop.mailserver.it
- SMTP: smtp-out.mailserver.it
- Door in: 110
- Door out: 25
MailPEC Free
- POP3: mail.postacert.it.net
- SMTP: mail.postacert.it.net
- Door in: 995
- Door out: 465
Free PEC configuration on the desktop version of Gmail
The desktop version of the well-known e-mail service appears when using Gmail, on a browser on a PC (the operating system is irrelevant, the interface and procedure are the same on Windows, Mac and Linux).
receive emails gmail certified mail:
- connect to the Gmail site;
- enter the credentials of your Google account and enter (email address or telephone number and password);
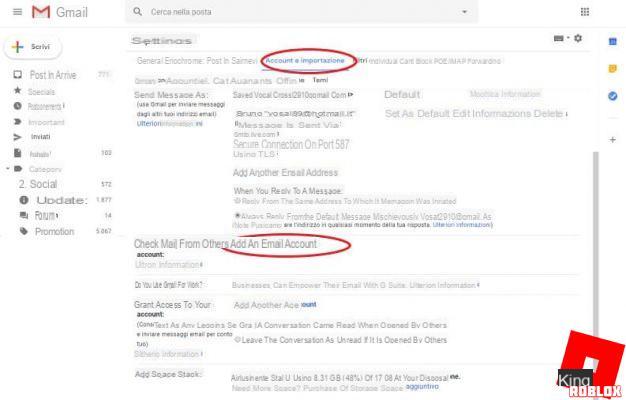
- in the main screen of Gmail, at the top right click on the gear icon and then on the item "Settings";
- in the "Settings" menu, click on the "Account and import" tab;
- in the tab on the item on "Add e-mail account";
- a thealog box will open, as required enter the PEC address and click on “Next” to continue;
- on the next screen, choose "Import emails from my other account (POP3)" and click on "Next";
- then fill in the "Username and Password" fields (with the PEC credentials), set the server POP and port through the appropriate drop-down menus and customize the rest of the settings accortheng to your needs, then click on the "Add account" button at the bottom right to complete the procedure.
 From now on, any PEC added to your account will be managed by Gmail.
send certified mail messages you have to proceed with some other steps:
- repeat the first 4 steps of the previous procedure, until you reach the "Account and setting" screen;
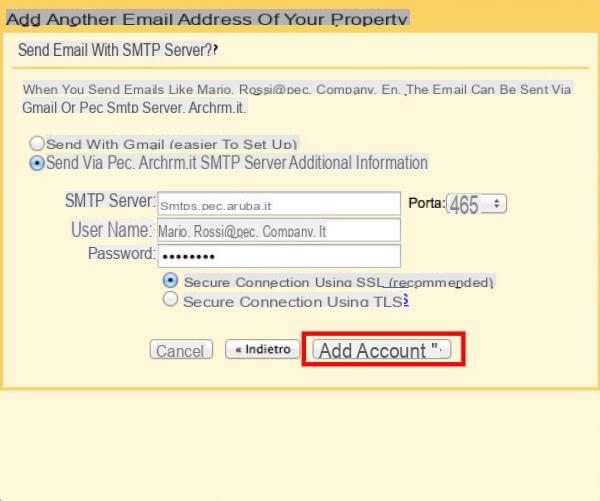
- click again on "Add another e-mail address":
- enter the PEC address again in the thealog box, and check “Consider as an alias” and then click on “Next step”.
- in the following configuration screen, enter the password (of the PEC) in the appropriate field, then check the item “Secure connection via SSL” and finally press on “Add account” to finish the configuration.
At this point the Google Webmail is also ready to send messages via your PEC.
Configure PEC Gmail on Android
The Google Mail Android client is very comprehensive and also has a process of setup wizard of additional email addresses (inclutheng PEC).
Achieving this procedure is simple:
- open the Gmail client, and press the menu button at the top left (there are 3 vertical lines);
- scroll the menu to the end, and press on "Settings";
- then click on “Add account”, and then on “Other”;
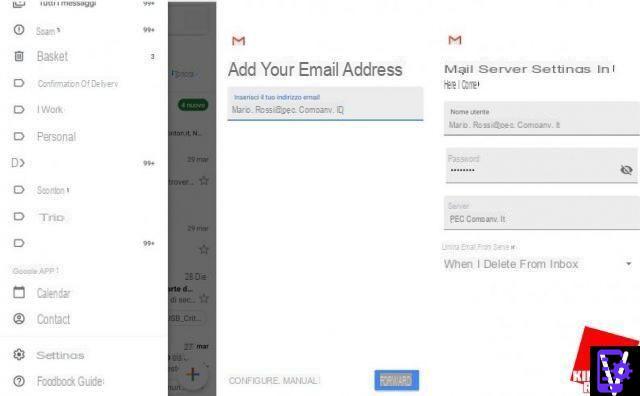
- enter the certified email address and click on "Next";
- press on "Personal (POP3)", enter the Password and on the "Next" button;
- a summary window will appear (if it is correct), it is advisable to click on "When I delete the Inbox" and put "Never" (for greater security) you can then press "Next" again, at this point the configuration is over.
This is the setup wizard procedure, which usually works just fine. In your case this does not happen, delete this account, and perform the procedure we have described from the desktop.
Configure PEC Gmail on iOS
The Google mail client for iOS is also really complete and appreciated. Setup is simple, just:
- Download the Gmail app from the App Store;
- once the installation is complete, start it, on the first screen select "Log in" and then click on "Add account";
- in the next screen press on “Other (IMAP)”, then enter the PEC address and its password;
- Then click on “Next” to finalize the operation.