Find public and private IP address
There are two types of IPs: public and private. Both are essential for surf the Internet, but they have some differences, so it's important to know how to identify them.
The public IP is the one assigned to us by our Internet provider. Although it is possible to change this by assuming a Exclusive IP, the most used is a VPN that serves to hide this identification number. If you are interested in the subject, we will explain how to create, configure and connect to a VPN in Windows.
As for the private one, it is a number that is used to synchronize a device on the local network, in this case the PC with the Wifi router . This can be altered, acquiring the value of static or variable IP and that is what we will talk about in this article.
First of all, you need to find out what your IP address is. There are many ways to do this. This time we will show you two different methods.
Method 1: via the Windows 10 settings menu.
- Go to Home.
- Select Settings. Then click on the box Rete and Internet. Finally, in the left panel select our connection type, Ethernet or Wi-Fi.
- In the Property you will find the IP identified as IPv4 address.
Method 2: via the Windows command prompt. It is a powerful tool that integrates Windows that can help you perform many other tasks. On our website you can learn what the CMD command prompt is for and how to use it.
- Enter the Run menu. You can do this by executing the following key combination: Windows + R.
- Write cmd. Then click OK. A window with a black background and white letters will open. This is the Windows command prompt.
- Write ipconfig. Then press the Enter key.
- The private IP will be identified as IPv4 address.
Find out how to change the fixed IP address in Windows 10
Thanks to the DHCP protocol, every device that connects to a Wi-Fi network is assigned automatically an IP address. This avoids conflicts or errors in the router every time a new device is connected. But sometimes it is necessary to change this direction. To do this, perform the following steps.

Using the command line
Windows 10 is a very versatile platform and allows you to make changes to its configuration from different windows. And one of them is the command prompt or command line and from there we will be able to change the IP address in a very simple way. So let's see what are the steps to follow to achieve this change.
First we have to open command prompt as administrator and to do this we will go to the lower left corner and click on the Windows icon. This way we will open the start menu, the next step is to type cmd in the search box and then press the Enter key.
CMD will appear as a result and you have to choose the option 'Run as administrator' this action will generate on the screen the unmistakable black box to enter the command lines. In our case we have to use the netsh command to change the IP address. Then we will write the following command:
IP interface netsh sets the address 'Description' static% adresse %% netmask %% gateway %% metric%
Where you have to replace 'Description' with the name you will give to the connection, % adresse% replace it with the IP address. % netmarsk% replace it with the subnet mask,% gateway% replace it with the IP address of the gateway. And finally substitute% metric% for the network card and it's usually always general rule 1.

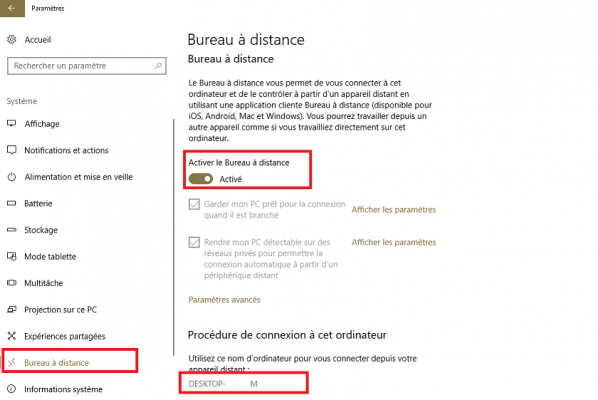
Using the control panel
- Go home.
- Type in the search bar Control Panel. Then select the option with the same name.
- Check the box for Network and Internet. Then open the Network and Sharing Center option. Finally select the Change adapter settings option.
- Once inside this menu, we select the network we use to browse the Internet. Right-click and check the Properties box.
- Then a window with a lot of information will open. Double click on the option Internet Protocol Version 4 (TCP / IPv4).
- For security reasons, Obtain an IP address automatically will always be configured by default. Change the setting to Use the following IP address. You will be able to write the new address in the IP address box.
- Save your changes.
You can use any address you like best, but it must conform to certain parameters. The new address must always begin with the sequence 192.168.0… followed by a number between 2 and 254 (1 is reserved for the router). From now on, your PC will always have the same private IP address, known as static or fixed IP address. This would be the first step in setting up a networked computer and sharing Windows 10 files and folders without a homegroup.
Things to know when changing your PC's IP address
Sometimes it is necessary change the IP address of a device to perform certain jobs. Maybe you need to share files with a printer or you need a fixed IP for a program to work properly.
However, you should consider that in terms of security, a static IP is more vulnerable. Keep in mind that, because it doesn't vary, it's much easier for any attacker to gain access to it. For this reason, if you are planning to enter or change a fixed IP address on your PC in Windows 10, we recommend that you also know about computer vulnerabilities and what you can do to reduce them.